Toggle Nav
 Inspire.
Create.
Stitch.
Inspire.
Create.
Stitch.
Search
Handcraft a festive touch! Make a personalized Christmas gift card holder that’s merry, handmade, and heartfelt.
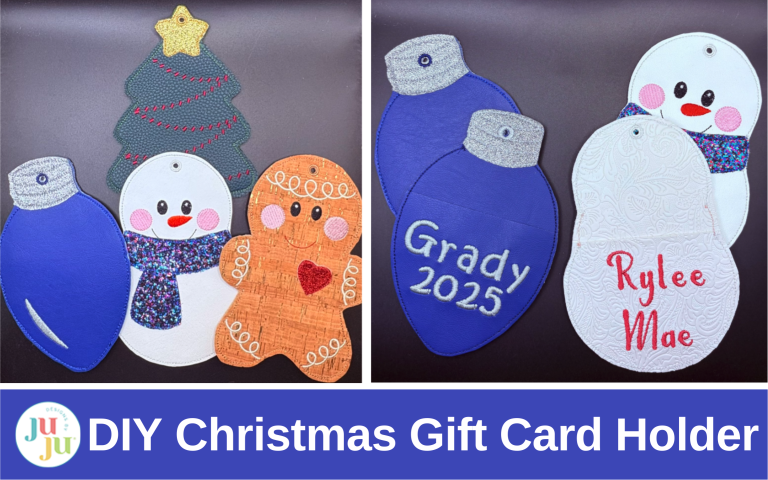
Do you enjoy creating one-of-a-kind handmade Christmas ornaments for your family? Do they get excited to see something made especially for them? Designs by JuJu has created four new Christmas gift card ornaments that you are going to love. These ornaments can be personalized with a name, date, or special message. They can hang on your tree or top that special gift. Visit Designs By JuJu today to create your own personalized ornament!
All of these gift card holders are created using the same process. I will guide you through each step, and then I will show you how I added my personal touches.
Check out the DBJJ team’s favorite supplies in the Designs by Juju Amazon store.

You can create these ornaments using either vinyl or felt. In this tutorial I will be using vinyl. Cut out three pieces of material: two measuring 5.5” x 7.5” and one square measuring 5.5" x 5.5”.

Upload your design, and hoop tearEZ Tear-Away Stabilizer in a 5x7 hoop.

Select a thread color that closely matches your vinyl. Make sure both the top and bobbin threads are the same color for a seamless look.

Take the hoop to your machine. Stitch the placement line for the ornament front.

Place your vinyl over the placement line, covering all the stitches. Be sure to leave enough extra material for trimming later.

Return the hoop to the machine and run the tack-down stitch.

Next, you'll add the embroidered details. Once you're done with the embroidery, take the hoop off the machine.

Place it back-side up on a flat surface. Tape the second piece of 5.5" x 7.5" vinyl to the back of the hoop, covering all the stitches. If you haven’t already, be sure to change the bobbin thread to match the top thread. This step is important for ensuring a neat finish on both sides of the ornament, especially when the back of the ornament will be visible. I’ve forgotten this step before, and let’s just say hot pink bobbin thread on the back of a Christmas ornament is . . . a look.

Run the next two steps. The first will attach the front to the back. The second step is the placement stitch for the pocket.

Align the 5.5” x 5.5” square piece of vinyl with the two stitch lines. Tape in place. Tape is our BFF here—use more than you think you need. Trust me, nothing ruins the mood like vinyl shifting mid-stitch. Stitch the pocket to the ornament.

If you’re making a tree or bulb ornament, the next steps add a touch of magic with applique pieces for the star or metal accents on the bulb. My stitches were a bit off. It’s a long story, but I managed to save the design. Yours should line up just fine.

Place the vinyl scrap over the placement stitches.

If you desire, you can also tape a piece to the back. Before stitching, change the top and bobbin threads to match the vinyl applique.

The final design step on all the ornaments is an optional eyelet.

When finished, remove the design from the hoop. Tear away the stabilizer.

Trim close to the stitching, ⅛” to ¼”. Tip: walk away if you’re nervous. Come back with fresh eyes (and steady hands).
Use a hole punch for the eyelet.
If making an ornament, use a hole punch, making sure not to cut the threads.

Your ornament gift card holder is complete!

Adding a name and year to your ornament makes it a keepsake to treasure. You can use embroidery software or create directly on your machine. Here’s how I stitched my personalization.

To personalize the back pocket of your ornament, start by loading your chosen design onto the embroidery machine. Add each letter of the name, one by one, and include the year for a special touch. I selected the Ainsley Embroidery Font from Designs by JuJu in the .75” size, but any similar-sized font will work beautifully.

Use the move arrows to arrange your letters just below the pocket placement lines, as shown in the above picture. Crafty confession: I always spend way too long nudging letters because I want them perfectly right. Totally normal.
If you’re searching for more font options, Designs by JuJu offers a wonderful variety to explore.
Once your letters are lined up, the next step is to run a quick test stitch to see your design come to life and ensure everything looks right.

Hoop the tearEZ Tear-Away Stabilizer in a 5x7 hoop and take it to the machine.

With the stitch forward key, advance the design to the beginning of your letters. My machine is a Brother Stelaire; your screen may look different.
Stitch letters out onto the stabilizer. This test run ensures spacing and alignment are correct. If they look a little wobbly, no worries! That’s why we test first. Better here than on your pretty vinyl. Return to the machine screen and readjust.

If they are lined up straight and equal distance apart, return to the first step by going back to the beginning of the design. Stitch out the design placement line. Then advance to the pocket line step. This will give you the outline of the ornament along with the pocket alignment as shown. Your personalization should be inside the ornament and below the pocket line.

Using the same stabilizer, place your pocket vinyl over the embroidered letters. Align the top with the pocket placement lines and secure it in place with tape.


When you’re done, gently pull the vinyl away.

Your stabilizer should look similar to mine.

I turn the hoop over, tape a piece of scrap stabilizer over the letters, and keep going. You might wonder why I’m still using the same stabilizer, but I like to save and reuse materials when I can.
This step is optional, so feel free to use a new piece if you prefer.

Take your hooped stabilizer to the machine. Make sure your design is on the second stitch, which is the tack-down for the front of the ornament. Position the 5.5” x 7.5” vinyl over the stitches, leaving room for trimming.
Continue with the previous steps for creating the ornament.

And that’s it! You’ve just made an ornament that’s not only adorable but also personal. When someone flips it over and finds that little pocket, they’ll know you made it especially for them.

Try personalizing the scarf on the front of this snowman, and the pocket on the back of the snowman. I did use software for the scarf.

Try textured or glitter vinyl for a festive touch.

And that’s it, your very own personalized Christmas ornament is ready to shine!
These little keepsakes make the holidays even more meaningful, whether you’re creating them for your own tree or as heartfelt gifts for loved ones. Every stitch and detail tells a story, and that’s what makes handmade treasures so special. So go ahead and stitch a few more! Because once you see how fun these little gift pocket ornaments are, one will never be enough.
Happy stitching, and remember to share your projects in the Designs by JuJu Embroidery Blessings Group on Facebook, or anywhere on social media using the hashtag #designsbyjuju. We love to see what you create. Your projects always inspire us!
