Toggle Nav
 Inspire.
Create.
Stitch.
Inspire.
Create.
Stitch.
Search
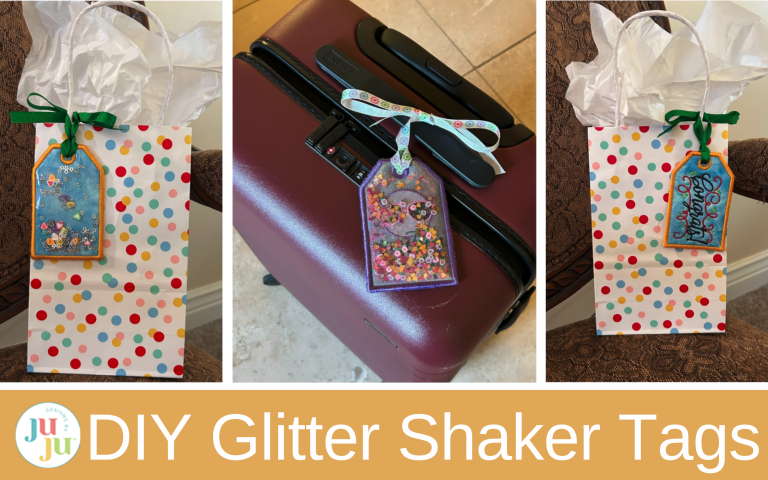
Create vinyl-covered shaker tags with glitter—a quick, easy project that adds sparkle and personality to your gifts.
Whether you want to add some creativity to your packages or your luggage, I’ll show you how to take Designs by JuJu® tags and turn them into a nice shaker tag. This will help you easily identify your luggage or set your gift apart from the pack. These tags are simple to make with only a couple of extra steps. I love an easy project that looks impressive when it’s done.
Check out the DBJJ team’s favorite supplies in the Designs by JuJu Amazon store.

Let’s start with a luggage tag. This tag has a design on the front and a clear slot for you to add your personal information on the back. For this tag we will add the shaker elements over the design.
Hoop the tear-away stabilizer and stitch the placement stitch.

Completely cover the stitches with your fabric.

Stitch the tack-down stitch.

Then run your decorative stitches on the tag.

Now remove your hoop from the machine. Flip the hoop over so the back side of your design faces up. Trim any really long threads. They will be covered, but you want to ensure they won't be poking out the edges of the tag.

Cover the stitches with Timtex Interfacing. This will give your tag some stability.

Then cover the Timtex with your back fabric.

Using painter’s tape or medical tape, secure the fabric in place.

Now carefully flip your hoop back to right side up. Add your shaker “stuff” on top of your design. I started with glitter.

Then I added some small embellishments and more glitter to the front. After I got this far, I realized I added too much stuff, so my design is hard to see. Less is more in this project.

I used my sewing spatula to scrape all the glitter and embellishments into the center of my design so they wouldn’t get stitched in the edge. Don’t forget there will be a eyelet at the top of the tag, so move them lower in the design. (I’m so grateful for my sewing spatula to hold things down while the embroidery machine stitches. It has saved my fingers more than once! Check out its battle scars!)

Place your clear vinyl over the top of your tag. Tape it in place and carefully transport the whole thing back to your machine.

Here I changed to a 90/14 embroidery needle since we are going through so many layers. Your machine may not need this, but I found it helpful for mine. Stitch the tack-down stitch. This will sandwich all the layers together and enclose the glitter.

Remove the hoop from the machine and place it on a flat surface to trim up all the excess fabric, vinyl, and interfacing from both sides. I start from the front and do them one layer at a time. Trim the vinyl as close to the stitches as possible.

Then trim the fabric.

Flip your hoop and trim the fabric on the back.

And lastly, the Timtex. This can be a bit tricker with its bulk, but trim as close as you can. The cover stitches for the edges are pretty generous, but I’ll show you how to check before we stitch them out.

Now I’m going to switch my bobbin to colored thread so that it's the same as the top thread I’ll be using. The design will be viewed from both sides, so I want them to match.

The next stitches are placement stitches for the back vinyl window. I like having the new color in my bobbin for this step so I know exactly where they are.

Place a piece of vinyl over the back of the design. The top of your vinyl should be at the start and stop stitches at the top of the tag before it starts to angle.

Tape it in place

Take it back to your machine and stitch the tack-down stitch. When it’s done, remove from the machine and trim the vinyl close to the stitches.

Return your design to the machine and stitch the first of the cover stitches. I like to stop my machine when it finishes with the zigzag stitches. Then I can check and see if there’s any place that my tag needs to be trimmed up.

Once everything is trimmed, put it back in your machine and let it finish the cover stitches.

Remove your design from the machine and the hoop. Tear away the stabilizer from your design.

Using scissors or an awl (my favorite), make an opening in the top of the tag. I did this by poking a hole first and then trimming each layer. Be careful not to clip a stitch. I did, but I used some Fray Check® to secure the stitches from coming further undone.

Add a ribbon to the tag.

And your personal information or business card slips right into the vinyl pocket on the back.

If you notice a little white from the stabilizer peeking through your stitches, find a Sharpie® marker that matches your thread and lightly color over the stabilizer; you will no longer even notice it.

Attach it to your bag and you're ready for your next vacation!

For greater security, you could use a metal chain, carabiner, or other hardware to secure the tag to your bag.
After making the luggage tag, I wanted to try a different method for my gift tag. I love the shaker aspect of the tag, but I also love the embroidery aspect and didn’t want to cover it up. So I’m placing the shaker part on the back of this tag. To do this we have to make a couple of adjustments to the process. But it’s simple and easy.
Start by hooping the tear-away stabilizer and stitching out the placement stitch.

Cover this placement stitch with Timtex first.

Then cover with the fabric.

Stitch out tack-down stitches.

Stitch out the design for your tag.

Here’s where we will deviate from the instructions. Remove your tag from the hoop and remove the tear-away stabilizer from the edges of the design.

Trim up the back enough that no threads will peek out the edges. Then cut just outside the placement stitches through both the Timtex and the fabric. Set this aside for now.

Hoop another piece of tear-away stabilizer. We need to reset our machine to stitch the first step of the design, which is the placement stitch. Stitch it on the stabilizer.

Place your fabric over the top of the placement stitches and stitch the tack-down.

Remove the hoop from the machine and trim the fabric close to the tack-down stitches. Flip your hoop upside down for the next step.

Take your embroidered piece of the tag and place it, right side up, over the back side of the design, lining up the edges with the placement stitches. Tape it in place. We will be stitching through this tape so use one that is easily removed.

Flip the hoop back over and place your shaker glitter and embellishments in the center of the tag. Push it all to the center so it doesn’t get sewn in the edges.

Cover it with vinyl and tape it in place.

Take it carefully to your machine. You will need to skip all the design element stitches. Stitch the tack-down stitch that will sandwich all the layers together.

Remove the hoop from the machine and trim the vinyl close to the stitches.

Flip the hoop over and remove the tape that was holding the back of the tag to the stabilizer. It should be held in place with stitches now.

Change your bobbin color to match the top thread. This next step will be seen from both sides.

Stitch the cover stitches. You can stop and check after the zigzag stitches if you want, but I didn’t find it as necessary with this tag as I did with the luggage tag.

Remove it from the hoop and tear it away from the stabilizer.

Open up the eyelet in the top and thread with a ribbon.

Attach it to your gift and you have a wonderful tag that looks amazing from both sides.


I hope this helps you realize how easy it is to make a shaker tag. If you try these, share with us in the Designs by JuJu Embroidery Blessings Facebook Group (or anywhere on social media using the hashtag #designsbyjuju) so we can see your creative take on these tags. We love to see what you post!
