Toggle Nav
 Inspire.
Create.
Stitch.
Inspire.
Create.
Stitch.
Search
End-to-end quilting embroidery is a creative game-changer—one design stitched seamlessly across your project.
This technique helps your patterns connect perfectly with no awkward gaps and no mismatched edges. With the right tools and a little know-how, you can transform simple fabric into something truly showstopping.
Designs by JuJu’s end-to-end designs consist of a continuous, single-run line and come in sets that include 13 sizes, ranging from 3.5” x 3.5” to 10” x 15.5”. A magnetic hoop is highly recommended for this process. You can edit these designs using embroidery software or directly on your embroidery machine. For those without software, I will demonstrate how to achieve great results using the tools available on your machine. I’ll be using a Brother 8500; your screen may look different. If you're not sure where to find the tools I mention, please refer to your machine's manual.
In this tutorial I am going to make a small baby blanket and a table topper.


Cut the top fabric, cotton batting, and back fabric to equal sizes. Then, sandwich them wrong sides together with the batting in the middle, and secure the layers with pins.

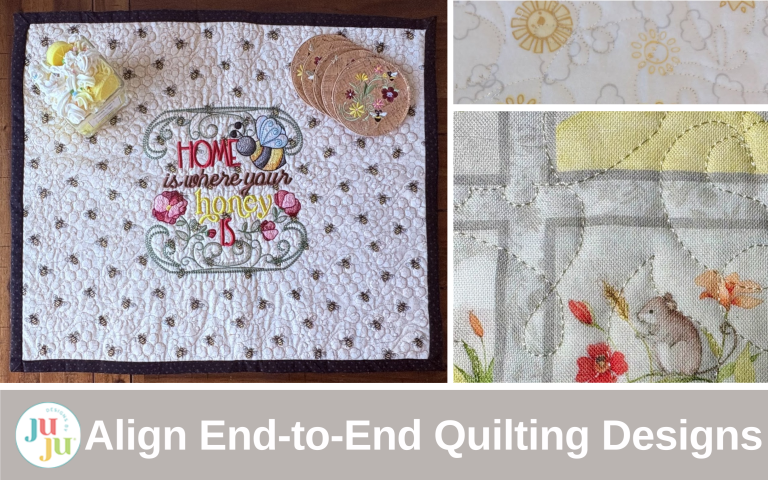
Select the end-to-end design you wish to use. For the quilt top, I recommend using the largest size your machine will accommodate. I am using a 9.5x9.5 hoop with an 8.5” x 8.5” Forest Friends End-to-End Quilting Embroidery Design.

Hoop the fabric sandwich. You want the edge of the fabric to be very close to the edge of the hoop. You do not need to use a stabilizer for this project.
Now, we will utilize the tools available on your machine.

Load the desired design. Select the Embroidery key.

Next, choose the design placement box, also known as the trial, trace, check, or outline key, depending on your machine. This feature allows you to preview the stitching area of your design before actual embroidery begins. It will move the embroidery hoop to trace the outline or the perimeter of the design. Select the top left corner key.

The machine will move to the farthest point on the top left side. As you can see, my design needs to be moved farther to the left.


Select the move key and use the arrows to adjust the design position.

With the bottom of the hoop attached, move the design to the far upper left corner. If you do this step without the hoop attached the machine may read it as needing a larger hoop.

Attach the top of the hoop to the machine. If you are satisfied with both the fabric and design placement, begin stitching. If any adjustments are necessary, make them now.

When the design has finished stitching, mark the last stitch with an erasable fabric pen. If your stitches are clearly visible you do not need to mark them. Mine are done for demonstration purposes.

Use the Stitch Forward/Back key to return the design to the first stitch. The machine will move to that position.

Remove only the top of the hoop and slide the fabric over to reposition the marked spot on the fabric under the needle. Stitch out the design. Proceed along the top edge of the fabric. Always ensure the needle is positioned at the first stitch and align the fabric with the needle until the entire top edge of the fabric is completed.

If you approach the end of the fabric and find there isn't enough room to hoop all the remaining fabric, you can use a piece of tear-away stabilizer taped to the end of the fabric.

I used painter's tape and found it to be too strong, making it difficult to remove. I recommend using embroidery or surgical tape instead.

For the second and subsequent rows, start by finding the top left corner of the design using the design placement box.

Position your fabric in the hoop. Line up the beginning of the second row with the first design in the top row.

Use the placement box keys to ensure the fabric is straight and has enough distance from the top design to prevent any overlapping stitches.

To give you a better example of the distance between my rows, this picture was taken after my second row stitched. I recommend ¼” to ½” between rows. Always use the placement box keys at the start of each new design stitch to maintain the correct distance across.

This is an example of the rows being too close together. You can see that my stitches in row one will overlap with row two.

Once the fabric is aligned properly, use the stitch forward key to move the design to the first stitch. Always begin each design at the first stitch, ensuring that the marked spot on the fabric is aligned with the needle. Continue with these steps to complete the end-to-end design across the fabric.


When you're finished, add binding and you will have a beautifully quilted baby blanket on both the front and back.


In this tutorial, I will show you another way to use end-to-end designs. Instead of working with one large design, we will utilize four 3.5”x3.5” designs and arrange them on the screen of the embroidery machine without using any software. We will rely solely on the tools available on the machine.

Choose the end-to-end design of your choice. Select the 3.5” size and load it onto your machine.

Open the Edit function.

Here, you will find the Duplicate key. Duplicate the design three times.

Use the Move key to separate the designs on the screen.

Use the arrows and the grid to align the beginning and end of each design.

Remember to allow ¼” to ½” between the top two and bottom two designs.

When you are satisfied with the arrangement, select the Embroidery option. You will now see the lines clearly; if adjustments are needed, return to the edit section to move the designs.

Pin the fabric top to the batting. My cut fabric and batting are 18” x 18” squares. No stabilizer is required since the batting will serve as the stabilizer. Hoop both the fabric and batting and bring them to the machine.

Using the design position keys, move the needle to the top left corner. If you’re satisfied with the design and fabric placements, prepare to start stitching. The machine will now stitch out the four square designs.

Once the four designs are finished, use the Stitch Forward key to advance the design back to the very first stitch.

Keep the hoop in the machine. Remove the magnetic top and slide the fabric over so the last stitch aligns with the needle. Since we stitched out four squares, ensure that you are lined up with the correct square.

After lining up the fabric and design, reattach the top of the magnetic hoop. Using the design placement keys, check the alignment at the top left, top center, and top right of the fabric. Ensure the fabric is straight so that the stitches will not overlap. Again, I like to space my stitches ¼” to ½” apart. When you’re satisfied, begin stitching.

Continue following the previous steps across the fabric. If necessary, tape tear-away stabilizer to the edge of the fabric so it will fit in the hoop. I recommend using embroidery or surgical tape to secure the stabilizer to the fabric.

When completed, your top will be completely quilted and ready to add a design.


I absolutely love how easy end-to-end quilting is! It’s amazing how it can make my projects look like they were quilted by a professional. Give these designs a try. You'll be thrilled with how they turn out!

To add an embroidery design, first select the design you want to use. I chose the Bee Word Art 2 Embroidery Set. I recommend the largest size you can embroider.

Hoop wash-away stabilizer and bring it to the machine. Use the design placement keys to find the center of the design and mark it with an erasable pen.

Next, find the center of the embroidered fabric top and mark it with an erasable pen.

Hoop the fabric, aligning the center mark on the fabric with the one on the stabilizer.


With end-to-end embroidery, the possibilities are truly limitless! This technique adds a polished, professional touch that is both enjoyable to stitch and delightful to admire. So let your creativity flourish from edge to edge!
Don’t forget to share your finished masterpieces in the Designs by JuJu Embroidery Blessings Group on Facebook, or use the hashtag #designsbyjuju anywhere on social media. We would love to see how you express your unique style using this versatile technique!
