Toggle Nav
 Inspire.
Create.
Stitch.
Inspire.
Create.
Stitch.
Search
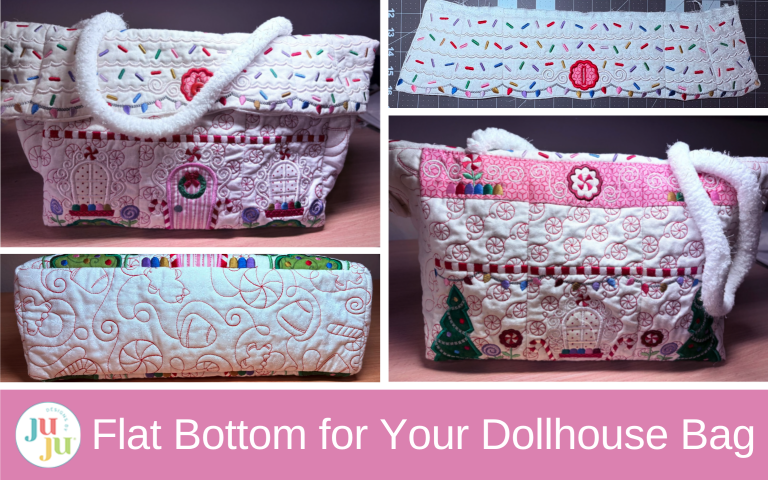
Give your Gingerbread Dollhouse Bag a sweet upgrade with quilted sides and a flat bottom!
If your little one’s Gingerbread Bag tends to tip over when it’s full of goodies, don’t worry—I’ve got the perfect fix! Adding a flat bottom gives it that cute, boxy shape (just like a real gingerbread house) and helps it stand tall during playtime or display. It’s a simple tweak that makes a big difference and keeps all those tiny treats and toys from tumbling out. Let’s get started and give this adorable bag a sturdy new base!
Check out the DBJJ team’s favorite supplies in the Designs by Juju Amazon store.

Before you start, sew the front and back embroidered pieces of the bag together. Measure the finished width and height of the bag and add 1" to each measurement for a ½” seam allowance. Always measure your bag since sizes may vary.
It helps to create patterns for all the lining pieces you will need.

For my 6x10 hoop bag, I cut the following:
(2) pieces 14” x 10¼” for the front and back
(2) pieces 10¼” x 5½” for the sides
(1) piece 14” x 5½” for the bottom
If your bag is larger, simply adjust these measurements to match your bag’s size—the construction steps will stay the same. Wait to cut your embroidered outer pieces until the embroidery is complete.

Choose your lining fabric and cut out the pieces.
Mark your ½” seam allowances.

On the front, back, and side lining pieces, mark ½” in from the bottom corners. On the bottom piece, mark ½” in on all sides.

On one side piece, mark two horizontal lines about 6” apart. This will be the opening for turning the bag later.
Now you can assemble the sides.

With wrong sides together, pin or clip the side lining pieces to the front lining. Sew from the top edge down to the ½” mark, using a ½” seam allowance. Backstitch at the beginning and end. Repeat to attach the back lining to the other side edges.


Attach the bottom lining piece.

Pin or clip the bottom piece to the front and back linings, wrong sides together.

Sew each side, starting and stopping at your marks.
Sew the corners last.

Match your corners and raw edges carefully. Sew across to close each corner seam.
Check your work.

Turn the lining right side out and ensure all your corner seams are secure and neat. Set the lining aside for now.
Your finished side pieces need to be as follows:
Start by loading the Gingerbread and Candy Quilting Backdrops Design onto your embroidery machine. You’ll use this design to create the sides and bottom of your bag.

Next, open the C_3 4 6 file from the Widths collection.Choose the size that fits your largest hoop. If necessary, you can hoop your fabric twice to reach the full design size needed.

Stitch out the 12.11" x 6.11" design size twice, then trim each piece to 10¼” x 5½”. These will become your side panels.

Mark each side panel ½” up from the bottom, just like you did for the lining.
Now you will add the side panels to the bag front.

With right sides together, begin at the top and sew a ½” seam allowance down to the mark at the bottom. Don’t sew all the way to the bottom corner.

Repeat to attach the back panel to the opposite side, remembering to stop ½” from the bottom each time.

At this point, your bag should really start to take shape!

If your straps use D-rings, center a ring at the top of each side panel instead of on the front of the bag. Repeat for both sides.

If you’re adding a single strap, simply center it on the back panel, as shown in the example.

Now it’s time to create the flat base that helps your bag stand up beautifully.

Using the Gingerbread and Candy Quilting Backdrops Design again, select the 14.11” x 6.11” size. If your largest hoop can’t accommodate that size, choose the largest one available and stitch the design twice. Sew the two pieces together with the seam running through the middle.

When finished, mark ½” in from each corner of the bottom piece.

Mark or pin the centers of the front, back, and both long edges of the bottom panel. With right sides together, align the centers and sew along the long edges using a ½” seam allowance. Remember to start and stop at the ½” markings on both ends.

Match up all four corners, clip or pin them securely, and sew across each one.

Turn your bag right side out and check all your corners to make sure they’re crisp and even.

Load the ITH Gingerbread Bag with Dolls project to your machine.

Stitch out two additional roof blocks (one right and one left) and sew them to your flap. Then add your flap lining following the directions in your original download.

Find the center of your flap and align it with the center of the back panel of the bag. With right sides together, pin or clip it in place. If you added D-rings, your flap sides should rest next to them. Sew across the top with a ½” seam allowance.

With the right sides together, place the outer bag inside the lining. Match the centers of the front, back, and sides. Your flap and straps should be tucked neatly inside.

Take your bag to the machine and sew a ½” seam allowance all the way around the top edge. Use the stitching lines on the outer bag piece as a guide. If you have D-rings, be sure they are out of the way before sewing.

Turn the bag right side out through the opening in the lining. Close the opening with either a quick machine stitch or a few neat hand stitches.

Tuck the lining neatly inside the bag and topstitch ⅛” around the top edge for a clean, professional finish.

Now your little one’s Gingerbread Dollhouse Bag has a perfectly sturdy, flat bottom—ready to hold all kinds of holiday treasures! Isn’t it amazing how a simple change can make such a big difference? This sweet little upgrade not only helps the bag stand up on its own, but it also gives it that extra bit of charm and durability for hours of pretend play.
If you try this project, we’d love to see your version! Share a photo in the Designs by JuJu Embroidery Blessings Group on Facebook, or anywhere on social media using the hashtag #designsbyjuju. Your creativity always inspires us!
