Toggle Nav
 Inspire.
Create.
Stitch.
Inspire.
Create.
Stitch.
Search
Light up your creativity with glow-in-the-dark embroidery that shines day and night!
Glow-in-the-dark embroidery threads are making a comeback. Perfect for unique designs on clothing, accessories, or home decor, these threads charge in the daylight and emit a magical glow at night, creating an enchanting, otherworldly effect. But threads aren’t the only glow-in-the-dark mediums you can use in your projects. Follow along with me as I use glow-in-the-dark threads, fabrics, and vinyls!
Check out the DBJJ team’s favorite supplies in the Designs by JuJu Amazon store.
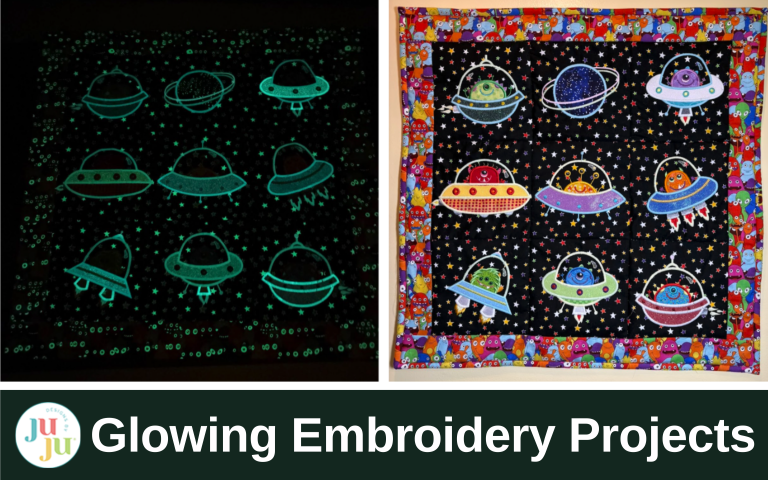
I put everything that glowed into this wall hanging: threads, vinyls, and fabrics. Using MS Word, I copied and pasted the Spaceship Monsters into a table so I could plan out the wall hanging. Since there are only six monsters, I used a couple of designs twice and rotated them to look different (besides using different fabrics on them). I also tilted a couple of the spaceships toward the planet on the top row.
The background for the wall hanging is the glow-in-the-dark star fabric by Benartex. It’s a good idea when embroidering blocks that will be used for quilting to cut the block a little bigger than your finished size. This is in case you have some shrinkage due to the embroidering. I want my blocks to be 7½” square, so I cut nine 8” blocks.

Once I started embroidering, the glow-in-the-dark thread broke a couple of times. I slowed the speed of the machine down, but not by a lot. That seemed to do the trick, but later when using the blue thread, that color kept breaking, so I slowed my machine to the slowest speed. Unfortunately, the slower the speed, the longer it takes to embroider a design, so I continually changed the speed of the machine throughout this project. I’m surprised the machine didn’t tell me, “Make up your mind!” Also, after I embroidered the first few blocks, I decided to fuse SF101 to the back of the rest of the blocks as the squares were looking a bit wonky.


One thing I learned as I sewed out these designs was that abutting two vinyls together didn’t make for a clean edge when satin stitched. Since this was my first time using vinyl, I didn’t get worked up about it, because it’s fun to experiment with these projects! A word to the wise: while I know we all trim close to the stitching after the applique tack-down, if you don’t trim close when you’re up against the vinyl, there’s a good chance your thread will show outside of the satin stitching.
After each block was completed, I took it into a dark room to see what I thought. Should I have outlined an element with glow-in-the-dark thread or should an element not have been a glow feature? I was also purposely not using glow thread on top of the glow-in-the-dark vinyl so some of the spaceship features would appear at night too.

Think about contrasts. The first time I sewed this spaceship monster I used a darker purple. After a mishap (cut the stabilizer away, not the fabric!), I chose a lighter purple so the monster showed up better against the black background. He was one of my first blocks, so for all the rest of the project I kept thinking, “Contrast, lighter, brighter . . .”


After all the blocks were embroidered, I trimmed and squared them so they each measured 7½” x 7½”. Next, I arrange them and sewed the blocks together into rows and then sewed the rows together. I pressed the seams lightly with the iron on low heat being careful NOT to iron the vinyl.

If you look back at my plan for the blocks, you’ll see that I accidentally swapped the red and yellow spaceship monsters. This time I’m happy about my mistake! I’d been thinking that the red monster kind of looks devilish, and giving him the center spot made it appear like he was leading them all into trouble.
The next step is sewing on the borders. To help the wall hanging hang straight, I took three measurements from the top to the bottom and took the average length to cut the side borders. Once they were sewn on, I did the same for the horizontal borders. Be careful if you have directional fabrics when you cut your borders.

Different people have different methods for sandwiching their quilted pieces. I thought I’d show you the technique I used for making my wall hanging. I put my backing fabric right side down on my cutting table and used extra-large binder clips to hold the fabric taut. Next, I placed the batting and then smoothed the wall hanging down on top.

I use safety pins to “pin baste” the three layers together. I’m going to stitch in the ditch, so I place pins in the corners of the blocks but not too close to the seams. I make sure that the top is smoothed but I don’t pull so hard that I’m stretching an area out of shape.

Once the wall hanging is all pin basted, I stitch in the ditch using a walking foot. By keeping the three layers flat and smoothed during pinning, and using a walking foot, I shouldn’t have any areas on either the front or back where material creases or wrinkles while quilting.

I always cut 3” strips for a folded binding. For this quilt I cut my binding strips and then pieced them together with a diagonal seam, which reduces bulk. You can make a diagonal seam by laying two strips with right sides together at a right angle. Draw a diagonal line from the top point of the fabric on top to the bottom point of the strip that’s on the bottom. Sew along that line and trim off the excess. Press the seam open.

Once all the binding strips are pieced together, I fold the binding in half, wrong sides together, and press well. I like to sew my binding to the front of the quilt, flip it around to the back, and stitch in the ditch. Again, different people like different binding methods. I place the binding with the raw edges against the raw edges of the wall hanging and use my walking foot to stitch them together. There’s a really cool way to sew mitered corners with this method and to get the binding to fit well, but they’re hard to explain in text. I use this Jenny Doan video that shows both techniques. The mitered corners technique starts at 6:30 and finishing the binding starts at 8:19.

Once the binding is all sewn on, I carefully place the project on my cutting table with all three layers smoothed out. Then, using my long ruler, I trim ½” from the seam line I just sewed. If you decide to try this method, be sure you don’t have part of the backing caught up underneath.

I like to make my sleeve at this point so I can machine sew the top of the sleeve to my wall hanging. From my sleeve material, I cut a rectangle the width of my wall hanging x 10”. My wall hanging is 24”, so I cut a rectangle 24” x 10”. I fold the short ends of the rectangle in a doubled ½” seam, press, and sew them down.

Next I fold the sleeve in half hotdog style with the wrong sides together and stitch it closed with a ½” seam. Once the sleeve is sewn, I pin it to the back of the wall hanging about ¼” down from the top.

Pull the binding to the back and pin or clip in place. I love the clips for this as I’ve really gotten scratched up pretty badly while working with a larger project with a bunch of pins.

Once the binding is pinned or clipped, sew in the ditch. Be sure you have the pins holding the sleeve out of the way so you don’t run into them. I also added a couple of pins to ensure the sleeve didn’t flip up and get sewn into the binding by accident.
Once the binding is all sewn, you’ll need to hand sew the bottom edge of the sleeve to the quilt.
Would you like to know a quick, inexpensive way I’ve hung quilts for years? This is mostly for wall hangings, which I don’t intend to change often. I cut a dowel the width of the sleeve. Lowe’s and Home Depot both sell wooden dowels and will often cut them to your desired length. I’ve also cut them with my small garden hand saw. Take a nail and a hammer to start a small hole in the middle of the dowel length. Insert the dowel into the sleeve. Using your fingers, find the hole you started and use a seam ripper to make a small hole in the sleeve at the same spot. Then screw an eye screw into the dowel. It doesn’t need to go all the way in—just enough to hold.


There’s a lot you can do with glow-in-the-dark materials. I’ll post another blog article soon showing you a few more things you can do to make your projects glow!
Please be sure to share your projects in the Designs by JuJu Embroidery Blessings Facebook Group, or use the hashtag #designsbyjuju anywhere on social media. We all love to see what you create!