Toggle Nav
 Inspire.
Create.
Stitch.
Inspire.
Create.
Stitch.
Search
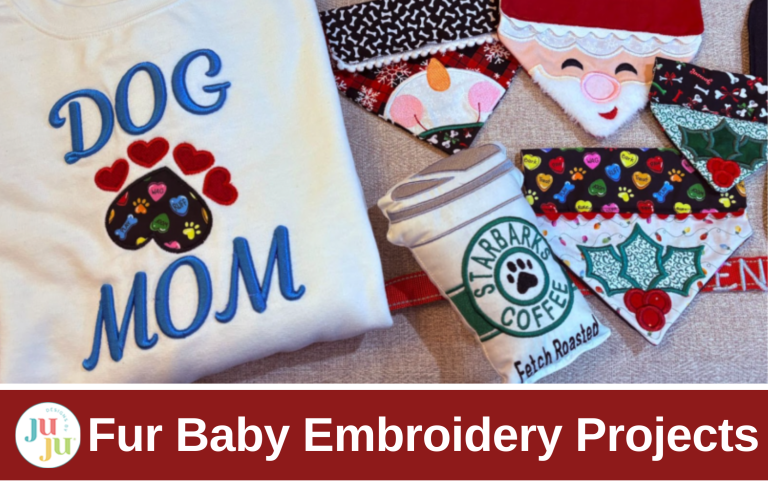
Give your best friend the gift of style! This Fur Baby Collection will have tails wagging all year long.
Are your dogs a big part of your family? Do you enjoy giving them special gifts made especially for them? In this tutorial, I'll show you five creative projects you can make to show your furry friend how much they mean to you. Whether you're a seasoned crafter or trying DIY for the first time, these fun and easy ideas will help you create memorable moments with your pets and make them feel truly special.
Designs by JuJu has a complete line of stabilizers as well as a lofty, soft batting. You can find the entire collection at Designs by JuJu+ – Your New Favorite Stitching Sidekick!
And remember to check out the DBJJ team’s favorite supplies in the Designs by JuJu Amazon store.
All of the following projects were done using a standard 80/12 embroidery needle.
Projects included in this post:

Let’s begin with a Christmas bandana. These ITH bandanas are simple and fun to make. Your furry friend will be strutting down the street on their next walk, proudly showing off their new bandana.
Designs by JuJu has released three delightful new Christmas bandana patterns. Crafted in the same style as their No Dip Dog Bandana, these versions feature festive holiday appliques for extra seasonal cheer. They come in four sizes from small to x-large, so every pet can have a comfy fit.

Select the size that best suits your furry friend and give them a festive look this holiday season.

Hoop tear-away stabilizer in your chosen hoop size and take to the machine.

The first step is the placement stitch for the front of the bandana. This will be the fabric that is appliqued on, so choose fabric with that in mind.

Place the cotton fabric right side up over the placement stitches, leaving enough room for trimming later. Pin the fabric to the stabilizer. Always make certain the pins are well outside the line of stitching. Stitch the tack-down stitches as well as the placement stitch for the casing. This placement line will be used later.

If you want to add a rick rack or other fun trim, place it along the top edge of the bandana. The next step will sew it in place. Ensure the center of the rick rack or trim lines up with the top stitch line. Use tape to hold it in place.

Next, you’ll work on the applique.

Be sure to trim each applique piece before moving on to the next step. When finished with the embroidery, remove the hoop and set it on a flat surface.

The final step is the back and top front that forms the casing. Place the fabric over the bandana right side down. Return the hoop to the machine. Stitch the final step.

Remove the bandana from the hoop and tear away the stabilizer. Trim ¼” to ⅛” around. Leave 1” of fabric at the turning opening.

Turn the bandana right side out. Push out the corners and give it a nice press.

Fold the top of the bandana toward the front and line up the bottom edge with the placement stitch line for the casing. Pin it in place, then bring it to your sewing machine.

Sew across ¼” from the edge of the casing. Remember to backstitch at the beginning and end. This will also sew the opening closed. Remember that both the top and bobbin threads will show, so match these threads to your fabric.

Your Christmas bandana is complete. Let’s continue on to make the entire set!!
Remember to check out the No Dip Dog Bandana for everyday wear.
If your pup can’t start the day without their daily “Starbarks” fix, this DIY project is going to be a tail-wagging hit! Let’s stitch up an adorable Starbarks stuffed toy that looks just like their favorite pup cup minus the caffeine. This toy is the perfect way to spoil your furry bestie while showing off your crafty side. Gather your fabric, stuffing, and Starbarks Dog Toy design, and let’s whip up a plush treat that will have your dog begging for seconds!

You can choose from two sizes for this design: 6.97” x 4.98” or 7.94” x 5.70”. Choose the one that works best for you and load it onto your machine.

Begin by hooping a piece of stabilizer.

Cut your cotton fabric to fit the hoop. You can either secure the fabric in the hoop or let it float above.

Run the first step. This is the tack-down stitch for the front of the design. The next three steps are the embroidery design.

The last step is to attach the back to the front. Place a piece of cotton fabric over the top of the design. Be sure to cover the entire design with enough room for trimming.

After you finish, take the design out of the hoop and trim around it, leaving about a ¼” to ⅛”. Leave at least ½” of fabric at the opening so you can close it easily.

Gently turn design right side out and fill your toy with Poly-fil, shaping it to your liking. Tuck the opening neatly inside, then sew across the bottom with your sewing machine. Remember to backstitch at the start and finish for a sturdy, lasting toy.
Keep mealtime neat and stylish with a DIY dog food and water placemat that’s easy to make, fun to customize, and pup-approved! Collect your fabric and let’s create a stylish little feeding station your furry friend will love!


To get started, I sketched out two bone shapes, one large and one small. If freehand drawing isn’t your style, don’t worry. There are plenty of printable patterns available online. I then used these shapes as templates to cut my pieces from waterproof canvas.

Cut out the front piece of the placemat. Don’t cut the back piece until you finish the embroidery. You can use matching or coordinating fabrics. For the food and water labels, cut two small bones from a coordinating color of waterproof canvas.
Alternatively, you can keep things simple by stitching a rectangle mat and adding two small shapes with the words embroidered on them. Once you’re ready, choose a font for your FOOD and WATER labels. I went with the Lemondrop Embroidery Font in the 1¼” size—it’s playful, easy to read, and the perfect fit for this project!

Load the letters onto your machine’s screen, then use the arrow keys and on-screen grid to nudge and align each letter into place until everything lines up. If you have software you can complete the words there and transfer them to your machine.

Hoop tear-away stabilizer and take to the machine.
Locate the center of your design, then lower the needle to that point. Use a marking pen or pencil to mark the center directly onto the stabilizer.

Find the center of the small bone and mark it with a straight pin. For fabric projects, I usually prefer heat-erasable markers, but I don’t recommend using them on waterproof canvas. If you do need to press the canvas, use a low heat setting and place a pressing cloth between the iron and the fabric. Too much heat can cause the backing to melt.

Line up the center of the bone with the center mark on the stabilizer, then pin or tape the canvas securely in place.

Use the design placement buttons to ensure your design is centered and fits properly. Choose your thread color.

Once you’ve confirmed the design is centered, go ahead and stitch the FOOD letters.

Next, repeat the process to stitch the word WATER onto the second bone.

Tear away the stabilizer from the back of each bone, carefully working around the stitches.

Use a ruler or sewing gauge to center the food and water pieces so they’re equal distances from the edges and from the top and bottom. Pin them in place.

Set your sewing machine to a zigzag stitch. I like using a width of 5.0mm and a length of 0.1mm—this creates a smooth satin edge that finishes the bones neatly.

Because waterproof canvas has a PVC backing that can catch on the feed dogs, place a small piece of tear-away stabilizer on the back of each bone—enough to cover the area you’ll be stitching. This will help it glide smoothly while you sew.

I like to use my J foot, centering the two fabric pieces along the middle of the foot for a straight, even stitch.

The above picture shows the stitching once around. To cover the edges completely I recommend stitching all the way around the bone twice for a crisp, polished finish.


When finished, tear away the stabilizer on the back.

Take the backing fabric and place it wrong sides together with the top.

Sew a long running stitch around both pieces to hold them together. This does not need to be neat and even. We will be removing these stitches later. This is so you don’t have to worry about working around pins or clips. Trim the back piece to match the front. Since embroidery can sometimes pull the fabric, doing this step last helps everything line up perfectly.

Using the same zigzag setting we used for the bones, satin stitch completely around the placemat. Again, I recommend doing this step twice. Remove the long running stitch.

Your placemat is complete!
When it comes to spoiling our pups, nothing says love quite like a collar and leash made especially for them. A personalized set isn’t only stylish—it’s also a way to keep your dog safe, show off their unique personality, and turn every walk into a little fashion moment.


Every pup deserves a collar that’s as special as they are, and that’s where embroidered collars come in. Instead of a plain old strap, your dog gets to wear their name, a fun saying, or even your phone number stitched right in—no jingling tags required! It’s practical, stylish, and a little bit extra (in the best way). Plus, with endless colors and fonts to choose from, you can match your pup’s collar to their personality—whether they’re sweet, sassy, or a total goofball. If your collar has plenty of space, include both a name and phone number.
Embroidery Fonts - Designs by JuJu will have the right size and personality for you. Slip the collar onto your pet and adjust the fit before you start embroidering.

Tiny collars shine with only a name stitched on.

Measure the width of your collar to pick the perfect font size. For collars slightly under 1” wide, a .75” font or smaller works well.

Mark the collar’s center with a pin

Once you’ve chosen your font, load it to your machine. If you have software, you can design your collar there and then transfer it to your machine. If you don’t have software, I will walk you through the steps to complete the design on your machine screen.

Before you add any letters, open your machine’s Shapes menu and choose a simple rectangle. My machine is a Brother Stelaire; your screen may look different.

Size the rectangle to match your collar’s width. For example, if your collar is 1” wide, set the rectangle to 1” wide too. My collar is ⅞” wide so I sized my rectangle to just under 1”. Make it as long as you need for your hoop size and lettering.

Choose the font size you want and add your letters to the screen. I used all lowercase letters since they fit well on my collar. Once your letters are on the screen, use the move buttons and grid to align them. I like to arrange the letters first, then adjust the rectangle to fit over them.
This rectangle serves as your placement guide on the stabilizer for the collar. Ensure your letters fit neatly inside the shape. If you’re thinking about adding extra words, count how many 1” squares your rectangle and letters take up on the screen. This makes it easy to plan your space with confidence.

Once you are satisfied with the placement of your letters inside the rectangle, hoop the adhesive-back stabilizer, score, and remove the paper backing and take it to the machine.

Use the Placement keys and mark the center onto the stabilizer. If you are doing both a name and phone number, I recommend starting at the far left end of the collar instead of the center. Run the first step. This is the placement line for your collar.

Center the collar inside the rectangle. If you used a pin to mark the center, take it out now. Press the collar onto the adhesive with your fingers and use tape to hold it in place. You might want to add tape in a few spots along the collar.
Be sure to remove the tape as you stitch along the collar. For best results, do not stitch over the tape. The collar can move out of place easily, so stay nearby while the machine is stitching.

Once you have completed your stitching, remove the collar from the hoop. Gently tear away any stabilizer from the back. Your personalized collar is complete!

Personalizing a leash is such a fun way to add a little flair and make everyday walks feel extra special. Whether you’re stitching your pup’s name or a playful saying, it’s easier than you think with only a few simple steps.

Start by measuring the width of your leash. This tells you how tall your letters can be.

On your machine screen, load a rectangle shape and size it to the correct width. If your saying is a bit longer, no worries, you’ll use multiple rectangles to space things out.
Next, choose a Designs by JuJu font you love in a size that works well on the leash. Load the letters for your saying, then use the grid and Move keys to line up the letters nice and straight. Once they look good, place your rectangles over the letters to frame everything just right. For my leash I used Ainsley Embroidery Font in the .75” size and all capital letters.

On my Brother Stelaire, pressing the Embroidery key will open up my Layout screen and allow me to rotate my design. If you are unsure how to do this, check your machine’s manual. Most machines have a way to do this. Rotating the design allows me to use a smaller hoop.

If you’re stitching multiple rectangles, move the designs to the far left side of the screen. This will allow you to fit two or more in the same hooping and save on stabilizer.

When your design is ready, hoop the adhesive tear-away stabilizer. Run the rectangle placement stitch. Center the leash inside the stitches and tape down in a few spots to keep it secure while stitching. Peel the tape off as you go so it doesn’t get caught in the stitches. Keep an eye on the leash and make sure it stays inside the placement lines as you stitch. The nylon can shift easily.

After you finish stitching, remove any stabilizer from the back and you’re done! A plain leash is now a one-of-a-kind piece that shows off your pup’s personality (or reminds you to remember the bags) every time you head out for a walk.
If you’re anything like me, you can never have too many sweatshirts or too many ways to show off your love for your pup! This project combines puffy embroidery letters with a sweet heart paw applique, and the result is a cozy, custom “Dog Mom” sweatshirt you’ll want to wear every day. Whether you’re stitching one for yourself, making a gift for a fellow dog lover, or simply looking for a fun embroidery project, this tutorial will walk you through everything step by step.

If you have software, add your letters and paw, then transfer the design to your machine. If not, don’t worry, I will guide you in creating the design directly on your machine.

Choose the fabric for the paw and the color of puffy foam you will be working with. You can even use white foam and any color of thread you choose. The foam will be underneath the thread. Since I have a variety of colors I am going to match my foam with my thread.

An option for the sweatshirt is to fuse an interfacing to the back. This will provide extra stability to the sweatshirt. I use Pellon® SF101.
Load the 4” heart paw applique design to your machine. Ensure the design appears centered on your screen.


Load the font to your machine, and choose the 2” size. Load the letters to write DOG and MOM or whatever you want it to say.

Using the Move key and the 1” grid on the screen, arrange the letters, DOG above the dog paw and MOM underneath. Align the bottom of the letters with the grid lines. The size should be approximately 7.96” x 6.33”.

Once everything is lined up, let’s do a test run. This helps you spot any changes you need to make and gives you a pattern for sizing. Since this is only a test, hoop some scrap stabilizer (don’t waste the good stuff and tape two pieces together if needed). Stitch only the start of each letter and the paw outline to check alignment and size. If something looks off, make your adjustments and give it another go. With each try, lining things up will feel more natural and effortless.

Once you are satisfied with your letters, remove the stabilizer and use a ruler to cut it even on all sides. My template is 7¼” x 8¾”. Yours should be similar, but it doesn’t have to be exactly the same as mine. As long as you are happy with the design and letter placements, then it’s perfect.

Place the template on your sweatshirt and step back to admire your work. If it looks right, you’re ready for the next step. Tip: Try on the sweatshirt with the template pinned in place to preview your design placement.

Fold the template in half, both horizontally and vertically. Mark the center. Set aside.

Press the sweatshirt down the middle.

Mark with a pin at the top, middle, and bottom center.

Position the template on your sweatshirt. I like to measure three fingers down from the collar for perfect placement. Keep in mind the design will begin with the letters, not the template. This picture would actually be more like four fingers down. You can also pin the template in place and try the sweatshirt on, or use a T-shirt placement ruler if you have one.

Once you have the template where you want it, fold it upward and mark the center onto your sweatshirt.

Hoop the adhesive-back tear-away stabilizer in your hoop and take it to your machine.

Using the Placement keys on your machine, find the center of your design. My machine is a Brother Stelaire; your machine may look different. It's a good idea to consult your machine's manual if you are unsure where any specific buttons or keys are.

With the needle down, mark the center of the design onto your stabilizer.

Remove the hoop and place on a flat surface. Align the center mark on your sweatshirt with the center mark on the stabilizer. Use your finger to smooth gently, don’t stretch. You do not want to pull or tug. Return the hoop to the machine. Smooth the sweatshirt flat again.

Use the Placement keys to find the center top, middle, and bottom of the sweatshirt.

This should line up with the pins you placed at the top, middle, and bottom. The pins are only there to ensure the sweatshirt is straight. Once you are certain your sweatshirt is straight, you can remove the pins.

If needed, gently finger press the sweatshirt to the adhesive once again. Take care to ensure all wrinkles are out and, if you applied interfacing to the back, that it is smooth as well. Once everything is set, you can pin the top and bottom of the sweatshirt to the stabilizer. Keep the pins out of the embroidery area.

Place the foam over the top of the sweatshirt.

Choose your thread color and begin stitching.

When finished with DOG, gently pull up the foam. I forgot to take a picture so I will demonstrate with MOM.

Advance your design to the first M. We are going to stitch out MOM before we do the applique. Stitching the top and bottom letters first helps anchor the sweatshirt and prevents shifting when you trim the applique fabric later.

When finished with the letters MOM, gently remove the foam.

Your sweatshirt should resemble mine.

Return to the first step in the paw applique.

I used one fabric for the paw and another for the hearts, but only one fabric works too.

Once you have your applique pieces stitched and trimmed, the final step will be the satin stitch. Again, I chose to do the threads in two different colors. If you are doing this, the first color will be the hearts.

When finished, your sweatshirt should resemble mine. However, don't worry if there are small differences; they are normal and part of the creative process. Remove the pins and the sweatshirt from the hoop. Pull away the stabilizer. Clean up the front if needed with a good shake! Mine was a mess. Do not iron or apply heat to the foam. If any foam remains around the letters you can use a blow dryer or heat gun on a light setting to melt these fuzzies away.

And there you have it—your custom DOG MOM or DAD sweatshirt! Each one turns out a little different, and that’s part of the charm. I love projects like this because they’re both practical and personal. Plus, once you get the hang of puffy embroidery and applique, you can mix and match fonts and designs to create endless sweatshirt variations. Imagine making one that says “Cat Mom,” “Dog Dad,” or even your pet’s name!
That’s a wrap on our DIY Fur Baby Collection! From personalized collars and leashes to festive bandanas, cozy sweatshirts, and snuggly toys, each piece adds a little extra love to your pup’s day. Whether you make one or the whole set, your furry friend is sure to feel extra special. Happy crafting—and give your four-legged bestie an extra belly rub from me!


Be sure to share your own versions with us in the Designs by JuJu Embroidery Blessings Group on Facebook, or anywhere on social media using the hashtag #designsbyjuju. We love to see what you create!
