Toggle Nav
 Inspire.
Create.
Stitch.
Inspire.
Create.
Stitch.
Search
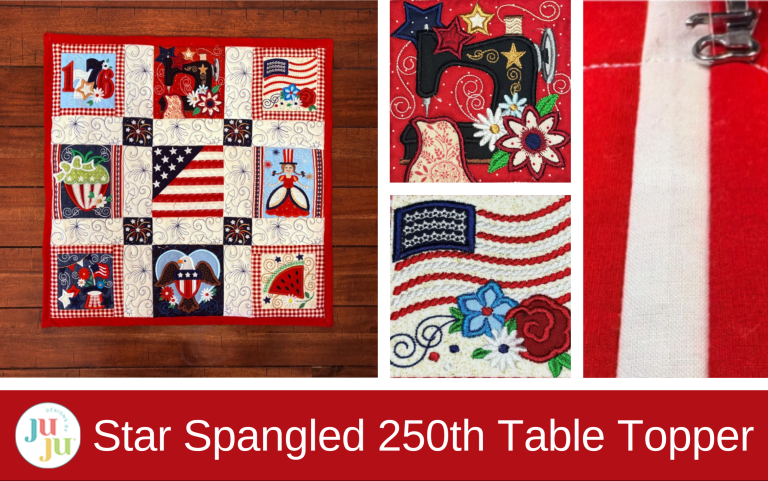
Celebrate 250 years of American independence with a star-spangled embroidered table topper.
Add a festive, handmade touch to your summer table with a star-spangled embroidered table topper that celebrates red, white, and blue style. As we honor 250 years of American independence, this patriotic embroidery project is a meaningful way to stitch history into your home decor. Perfect for Independence Day, Memorial Day, or any red-white-and-blue-themed gathering, this table topper turns simple fabric along with Designs by JuJu’s new Star Spangled Stitches set into a statement piece that shines at picnics, barbecues, and family dinners.
Finished size: 20” x 20”
Check out the DBJJ team’s favorite supplies in the Designs by JuJu Amazon store. And for all your stabilizer and batting needs, be sure to check out Designs by JuJu+.
Before we start working on the blocks, I’d like to show you a couple of different techniques these blocks use. Some of you may know these steps already, but it’s important to review them for anyone who hasn’t seen them before.

The first technique is to add a border completely or partially around a finished block. This is done before you remove the block from the hoop. Once the block is finished, it should look like this.

Complete all the applique and decorative stitching. After you finish, the next steps will add the border. Start by stitching a placement line for the first border strip.

Place your border fabric right side down, with its edge about ⅛” to ¼” above the stitch line. Check that your fabric is big enough—the sides should extend at least ½” on both sides. When you fold the fabric right side up over the stitch line, it should also extend at least ½” beyond the batting. This extra fabric is needed for trimming later.
Sew the tack-down stitch.

Fold the fabric back over the stitches so the right side is facing up. Smooth it out and ensure it lies flat. Sew the final stitch along the edge of the border piece. Don’t trim the fabric until you’ve taken the design out of the hoop.

Next, stitch the second placement line. Repeat the same three steps as before.

Do the same for the third border piece. Finish by adding the fourth border piece.

At this point, your design should look like this. Remove it from the hoop.

Turn your design over and trim the stabilizer close to the batting.

Now trim the whole design, leaving ½” from the side stitches all the way around.
Some designs use this method only on the sides, not the top and bottom, but the steps are the same.

This technique, also called stitch-and-fold, is used to make the flag block.

Start by loading the design and hooping the stabilizer.

Sew the placement and tack-down stitches for the batting, then trim the batting.

Next, stitch the placement line for the first stripe of the flag.

Place the fabric strip right side up over the stitches, ensuring there is at least ½” extra on the top, bottom, and sides. Sew the next step, which is the tack-down stitch. Trim the fabric close to the stitches along the inside edge only.

Sew the next step, which places the line for the second stripe of the flag.

Position the raw edge of the next fabric strip right side down, overlapping the stitch line about ⅛” to ¼”.

Stitch in place. Flip the fabric over the stitch line and smooth it flat. The next step will tack it down.

Keep repeating these steps until all the fabric strips are attached.

Be sure to trim each strip before moving on to the next.

The stripes will get shorter as you go, but always make sure at least ½” of fabric overlaps the batting.

When you’re finished, your stripes should look like this.

Sew the decorative stitching.

Now trim the strips. Be sure to leave at least ½” at the top two and partial third strip and along the entire bottom for trimming later.

Sew the next step, which is the placement line for the blue section of the flag. Place the fabric right side down and sew the tack-down stitch.

Fold the fabric back over the stitches, smooth it flat, and sew the next step to hold it in place.

Finish by adding the stars, then remove the design from the hoop. Trim the sides ½” from the outer stitches.
Now that we have gone over these steps let begin our Star Spangled Table Topper!
Load the designs onto your machine. For this project, I’m using the Star Spangled Stitches Set 1. This design set has nine blocks in multiple sizes. We will want to complete all nine blocks for our table topper.
Choose the first block in your preferred size. I’m using the 5” x 5” size of the Sewing Machine Block. Be sure to keep all nine blocks the same size throughout.

Hoop cut-away stabilizer and take it to your machine. Run the first step, the placement line for your batting.

Place the batting over the stitches, ensuring they are completely covered.

Run the tack-down stitch.

Remove the hoop from the machine and trim the batting close to the stitches.

Next, stitch the placement line for your background fabric.

Place your fabric down so it extends at least ½” past the stitches on all sides.

Run the tack-down stitch.

Continue by adding the applique pieces. The first stitch for each applique piece will always be the fabric placement stitch. Place the applique fabric so it fully covers the stitches, then run the tack-down stitch.

Trim the fabric close to the stitches. Using sharp applique scissors or fabric snips will make this easier.

Continue adding all the applique pieces, trimming after each tack-down stitch.

Finish your block by adding the decorative and satin edge stitches.

Once you’re finished, take the design out of the hoop and trim the stabilizer close to the batting.

Measure ½” from the background fabric stitches, then trim the block on all sides.

Make sure to trim all your blocks to the same size. This will make piecing them together much easier later.

Repeat these steps for the rest of the blocks in your set. If you’d like, you can sew the blocks together now to finish your topper.

If you want to keep going, we’ll use the Patriotic 1 Quilting Backdrops Design to make the sashing.

Load the quilting backdrop design onto the machine. Find the 2” sashing size that matches your block size.

I’m using the 5.11” x 2.11” size. If you used a larger block size than the 5” x 5”, load the size that fits your block.

Hoop a piece of cut-away stabilizer and take it to your machine.

Stitch the placement line for the batting.

Place the batting down, run the tack-down stitch, and trim close to the stitches.

Place your fabric down, making sure to leave at least ½” extra for trimming.

Stitch the decorative design, then remove from the hoop and trim ½” from all sides. Repeat these steps to make either 6 or 12 sashings, depending on your desired design.

If you make 6 sashings, your topper will look as shown.

If you want 12 sashings, you can add 2½” blocks, and your topper will resemble the picture shown.


To add the 2” blocks, load them from the Quilting Backdrops files. You can choose to stitch out the block as shown or add a design from the Daisy Doodle Patriotic Bean Stitch Applique Embellishment Set, as I did.

To add an additional design, click Add and open up the Embellishment Kit.


Select the 2.5” size.

Select the firework and add it to your screen.

Center the design inside the square.

With the Size key, reduce the size down to as small as it will go.

It will now fit nicely inside the square.

Hoop your stabilizer and start stitching.
Stitch the batting in place, then trim it close to the stitches. Place the background fabric down and stitch it in place.
When you come to the original firework design, do not stitch the original design, but advance to the Embellishment Kit design. Follow the steps to stitch the firework design.

Take the piece out of the hoop and trim to ½” from each side. Repeat these steps to make four 2.5” squares.

Arrange out all your fabric squares and sashings.

Sew the sashings and blocks together to make three rows.
Line up the first block and the first sashing with their raw edges together.

When joining two pieces, place them with right sides together and line up the raw edges. Having the same ½” trim on all blocks makes this easier. Sew the pieces together, using the two stitch lines on the back as a guide. Stitching down the center of these lines will hide the batting and block stitch lines.

Add the second block to the other side of the sashing. Next, add the second sashing, then the third block.

Continue until you have three rows.

Make two rows of sashing with the 2½” blocks, following the same pattern: sashing, block, sashing, block, sashing.
Sew the rows together as shown in the picture. Be sure to line up all the seams as you sew.

Press your seams open.
If you want to add extra batting to the back, now is the time. I like to add a light batting to the back of my table topper. I find it makes the back smoother and you don’t feel any bulk from the seams. This is totally optional. I cut a piece to fit my topper, sprayed the back of the fabric with basting adhesive, laid the batting down, and pressed it with a hot iron and pressing cloth. Trim the batting if needed so all the edges are even.

Your topper is now ready for the backing and binding. You can finish this part however you prefer. When making something small like a table topper, runner, or placemats, I choose to make my backing and binding all one piece.
To do this, I measure my top. Mine is 20” x 20”. I cut my backing 1½” larger, so my backing is 21½” x 21½”.

Press the raw edges under by ¼”.

Center the topper on the backing fabric. Fold the pressed edges over the front, and pin or clip them in place, ensure the folded edge stays turned under and lines up with the stitch lines on the blocks.

To make the corners, unfold the pressed edge.

Turn the corner as shown in the picture.

Bring the other end up and over, then clip it in place.
Tip: Work on one side at a time. Sew slowly and keep your stitching close to the folded edge. You may need to adjust the fold as you stitch along the other sides. I usually start with a ¼” fold, but sometimes adjust to ⅜” or ½”. It’s best to start small; you can always make the fold bigger if needed.

Once you’ve sewn all four sides, you’ll have a faux binding.

If you added extra batting, stitch in the ditch at the sides of the sashes to keep the batting from bunching.

Your table topper is finished!
Whether you’re hosting a backyard barbecue or setting the table for a quiet family meal, this Star Spangled Stitches Table Topper is a timeless way to celebrate 250 years of American independence. This simple project lets you combine creativity, tradition, and patriotism in one meaningful piece you’ll enjoy year after year. Stitch one for your home, give one to a friend, and let every thread tell a story of celebration and pride.
Don’t forget to share your finished table topper in the Designs by JuJu Embroidery Blessings Group on Facebook, or use the hashtag #designsbyjuju anywhere on social media, and inspire others to stitch along! We always love to see what you create!
Happy sewing!
