Toggle Nav
 Inspire.
Create.
Stitch.
Inspire.
Create.
Stitch.
Search
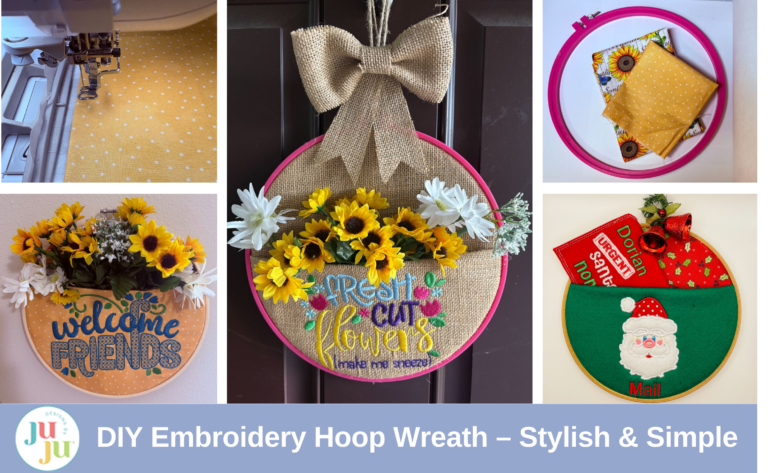
Create a charming embroidery hoop pocket wreath—perfect for quick décor, gift ideas, or showcasing your favorite designs!
I love projects that come together quickly. This embroidery hoop pocket wreath is just that project. You can add flowers to the front pocket and hang it on the wall or door. Or leave the pocket empty and showcase some cute fabric with an inviting embroidery design. I even made one to hold letters to Santa.
Let’s jump right in and get started. I’m excited to show you how to make this quick and simple embroidery hoop pocket wreath!
Check out the DBJJ team’s favorite supplies in the Designs by JuJu's Amazon store.


Measure the inside of the embroidery hoop. Based on the size of your embroidery hoop, select the design size that will fit best inside the hoop. Load the design to your machine. If needed, use the size button on the machine to adjust the design larger or smaller. Always keep in mind the design space gets smaller at the bottom of the hoop. For example, with a 10” hoop my design size is 4.80” x 6.80”. I then sized it up to 5” x 7”. That left me plenty of room for it to fit nicely inside my hoop.

With the trial key, find the top center of the design. My machine is a Brother Stellaire; your screen may look different.


Hoop tear-away stabilizer. Spray with the adhesive basting spray and take to the machine.

Cut a piece of fabric for the pocket larger than your embroidery hoop. This fabric needs to be folded in half. If using a 10” to 12” hoop, I recommend cutting the fabric at least 15” x 24”. If using a fat quarter, fold in half lengthwise. This will allow for plenty of room. Iron a crease at the fold. This will be the top of the pocket.

Align the center top of the fabric with the center top of the design. The needle should be in the correct position from the previous step. Press the fabric down onto the adhesive. Smooth out any wrinkles. Stitch out the design. When finished remove from the hoop and tear away the stabilizer from the back.

Cut the back fabric larger than the hoop. This fabric is just a single layer. It doesn’t need to be a perfect circle—we will trim it later.

Lay the back fabric and top pocket over the bottom piece of the hoop. Open the adjustable top of the hoop, giving you enough room to fit over the layers of fabric. Lay down the top of the hoop. Make any adjustments with the placement of the pocket. Once you are satisfied with how everything looks, press the top hoop down. You want to make sure the top of the hoop is centered on the design. This is important for it to hang straight.

Tighten the hoop and pull the fabric taut.

Turn the hoop over and trim the fabric close to the hoop.


If you don’t want to add flowers, another option is to add a large bow.
Imagine filling the front pocket with colorful flowers and hanging it proudly on your wall or door. Or you could gift it to a friend or family member to let them know you are thinking of them.

This one was made using a colorful plastic hoop and burlap. If using burlap, remember not to use your fabric scissors when cutting, and use a water-soluble film topper when embroidering to keep the stitching from sinking into the burlap.
For Christmas I used fabric and felt and created a hanging mailbox for letters to Santa. For this project I used the Santa Face 2 Applique and Letter To Santa In The Hoop designs from Designs by JuJu.

If you make a pocket wreath, please share with us in the Designs by JuJu Embroidery Blessings Group on Facebook, or anywhere on social media using the hashtag #designsbyjuju. We’d love to see what you create!
