Toggle Nav
 Inspire.
Create.
Stitch.
Inspire.
Create.
Stitch.
Search
Stitch a fun and cozy DIY embroidered fleece scarf — the perfect mix of warmth, style, and handmade charm!
When the weather turns chilly, nothing beats wrapping up in something soft, cozy, and handmade. A fleece scarf is already a winter essential, but adding embroidery takes it to the next level, combining comfort with a personal touch of style. Whether you’re stitching a favorite design or a monogram, let embroidery transform a simple scarf into a unique accessory or heartfelt gift. Best of all, fleece is easy to work with, so this project is perfect for beginners and seasoned stitchers alike. Let’s dive in and create a DIY embroidered fleece scarf that’s as warm as it is beautiful!
Check out the DBJJ team’s favorite supplies in the Designs by JuJu® Amazon store.
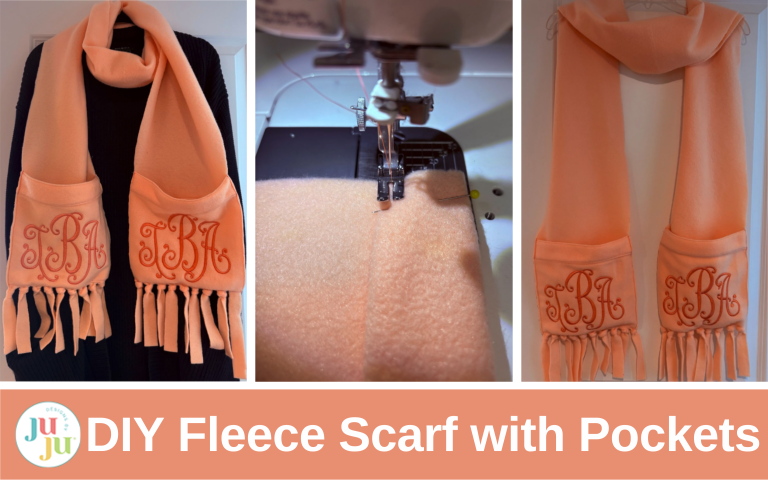
In this fun tutorial, I’m excited to show you how to create a scarf that not only keeps you warm but also has handy pockets and cute fringe.
We’ll start by picking out some soft fleece in colors and threads that you love.


Cut the fleece down the middle lengthwise to create two strips that are each 9” wide and 70” long.

Remove the selvedge edges from both strips.

From one of the strips, cut two pieces measuring 9” x 13”, and two pieces measuring 9” x 10”.

Sew the 9” x 13” pieces to each end of the 9” x 70” strip using a ¼” seam allowance. This will extend the length of your scarf, making it easier to wrap around your neck. If you prefer a shorter scarf, you can skip this step. The pockets added later will conceal these seams.


For each pocket, using the 9” x 10” pieces, fold the 10” side over ½" and then fold over another 1½” to create a hem.

Pin the folded fleece to hold it in place.

Take the pocket to your sewing machine.

Using matching thread or a thread to complement the fabric, sew across both sides of the fold to secure it. This will be the top of the pocket.

Choose a design for the front of the pockets. I’m using DBJJ’s Dazzling Monogram (currently unavailable) to add my initials. Each letter of the design comes in Middle, Left, and Right formats. Select the correct letters and align them in your software or directly on your embroidery machine screen. If lining up your letters on your machine, remember to use the grid on the screen to assist you. I’m using 6” letters. For my letters to fit I needed to rotate the design. I am using a Brother 8500; your screen may look different.
Designs by JuJu’s blog has many posts about using monograms if you need additional help. Try How to Monogram Initials with Embroidery Machine.
You can also use a cute embroidery design. Try a seasonal or holiday theme!

Hoop DBJJ+ magicMESH Cut-Away Stabilizer and take to the machine.

Use the design placement buttons to locate the center of your design. Depending on your machine type, this feature may be labeled as the Trial or Trace button. This function allows you to verify that your design fits within the designated area. I use these keys with all my embroidery projects.

Fold the fleece pocket in half lengthwise and mark the center. Place the pocket on the stabilizer, aligning the pocket’s center with the center of the design. Confirm that the hem is positioned at the top of the design (keep in mind this isn’t always the top of the hoop).

Use the design placement keys again to ensure the design fits well on the pocket.

Make any necessary adjustments, then pin the fleece to the stabilizer, avoiding the stitching area.

Place a piece of water-soluble film topper on top of the fleece to prevent the stitches from sinking in, ensuring a clean and professional look. Embroider the design. When finished, remove the fleece from the hoop and trim the stabilizer around the back of the design.

Once you’re finished with the first pocket, repeat these steps for the second pocket.

Measure up 6” from the bottom of the scarf and draw a line across using an erasable marker.

With the right sides of the fleece facing each other, position the bottom of the pocket ¼” past the marked line. The top of the pocket will be down toward the bottom of the scarf.

Take it to your sewing machine and sew ¼” from the bottom edge of the pocket.

Fold the pocket right side up. Trim the pocket if necessary to align with the sides of the scarf.

Pin the edges of the pocket to each side of the scarf. Take back to the sewing machine.

Sew again along the bottom and down both sides, keeping the seam ⅛” to ¼” from the edges. Attach the second pocket in the same manner. The top of the pockets will now cover the seams from the pieces added for length.

To create a fringe at the bottom of the scarf, mark every 1” across as shown. Cut strips up to the bottom of the pockets without cutting through the pocket stitches to create the fringe.

Tie a knot in each strip, and your fleece scarf is complete!


Enjoy your cozy new fleece scarf with pockets!
Now that you’ve created your cozy fleece scarf with machine-embroidered pockets, you have a project that is both stylish and practical. Whether you use the pockets to store your cell phone, wallet, or tissues, or just to warm your hands, these additions provide a special handmade touch that you’ll appreciate. Don’t forget to experiment with different fleece colors and embroidery designs to make it uniquely yours. These scarves can be a go-to gift this holiday season, and imagine how much your friends and family will appreciate having their own unique creation.
As always, we’d love to see how your scarf turns out. Share your finished project at Designs by JuJu Embroidery Blessings Group on Facebook, or anywhere on social media using the hashtag #designsbyjuju, and inspire others to try it too!
