Toggle Nav
 Inspire.
Create.
Stitch.
Inspire.
Create.
Stitch.
Search
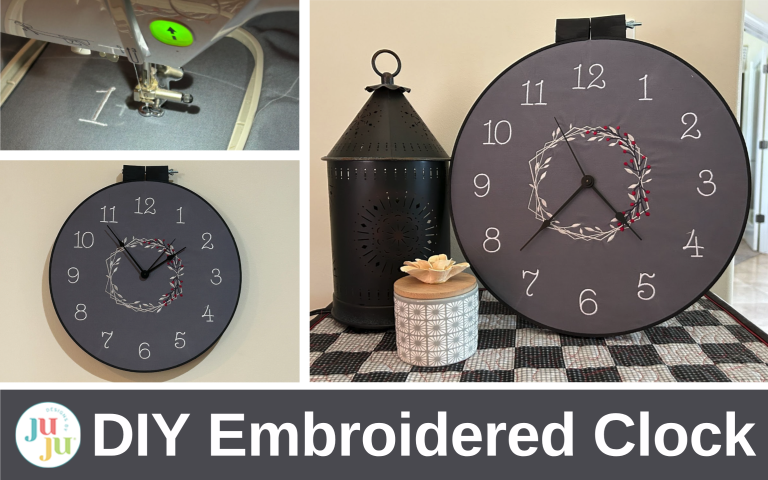
Hoop, stitch, tick—create your own embroidered clock with this easy DIY project.
I needed a clock in my sewing area. I always have my phone, but I wanted something I could hang on the wall and glance at “hands free” so that I could stay on pace with my projects. I looked all over for something that matched my style and decor but kept feeling like I was coming up empty-handed (ha). So I decided to make my own. I wasn’t sure how well this would turn out, but in the end I’m absolutely thrilled with the finished clock.
Let me show you just how easy it is to make!
Check out the DBJJ team’s favorite supplies in the Designs by JuJu Amazon store.

For my 14” clock I wanted to be sure I had plenty of fabric, so I placed my wood hoop and cut out a large square with at least 3” beyond the hoop.

For some extra fabric stabilization I fused SF101 to the back of the fabric.

Take your fabric back to your workspace to find the center of the fabric. I used my long ruler and, using my water-soluble pencil, I drew a + sign in the middle. This is the point that I will be using to make the rest of my placement marks. It’s always a good idea to test your pencil on a small scrap or edge piece of fabric to ensure it will disappear easily. I’d hate to do all this work and have the lines not disappear!

We will now get ready to draw the placement lines for the numbers. I used this printable sheet to get accurate angles for my clock.

I lined up my template with the center of my fabric. I did this by using a sewing pin and poking it through the center of the template . . .

. . . and then using that same pin, I placed it on the center point of the fabric.

Then tape down the template.

Using your long ruler, extend the lines from the template out onto the fabric.

Now I’m going to use the inner piece of the embroidery hoop and center it on the fabric. I used my long ruler to measure it from the center to the edges to be sure it’s centered.

Trace the outside of it. This shows us the outer dimension of the hoop, ensuring proper number placement.

Remove the line placement paper.
Now it’s time to hoop the fabric with some magicMESH Cut-Away Stabilizer. Place the bottom of your machine hoop under the fabric.

Using your hoop placement guide, center the fabric in your hoop. Make sure everything is perfectly square.

Stitch a lowercase “o” in the Office Embroidery Font in the center of the design. This is where the clock mechanism will come through the fabric.

After this you can stitch out a design for the center of your clock. I chose a wreath design but other things would definitely work. I ensure everything is centered around that center point in the design.

At this point I removed my project from the hoop.
I wasn’t sure what size numbers I wanted to use in my clock. Neither was I sure if I wanted white or black numbers. So I stitched out some numbers in the 2”, 1.5”, 1.25”, and 1” sizes. I stitched them out on matching scrap fabric and cut them out, then I placed them around the clock to decide what I wanted.

I decided I liked the white numbers in the 1.25” size (the ones at the 3 and 4 o’clock positions). I also used my scrap numbers to decide how far from the edge I wanted my numbers to be. I decided I liked the center of my numbers to be 2” from the edge of the clock. So I marked a line 2” in on each of the number lines.

Remember these marks will be the center of your number so they will extend toward the edge a bit more than what they show.

There are a couple of ways to stitch your numbers. You can individually hoop and stitch out the numbers one by one. But if you have a larger hoop and can accurately place your stitches, you can stitch a few numbers at a time. I’ll show you how to do it each way.
To individually hoop each number, you can use your small hoop and use the stitching guide to line it up. We want to line them up so they are aligned with the straight lines that run through 12–6 and 3–9 so that everything stays square. If you want to make a clock with purposefully skewed numbers though, I’d love to see it! That could be fun. But I like things orderly, so I’m keeping it all square.

Stitch out your number. I started with 12 and worked my way around.

Unhoop and continue re-hooping for each number.

To do a few numbers at one time we need to use a larger hoop. I made sure the hoop was vertically lined up with the 12–6 o’clock line. But I didn’t worry about lining anything up with the actual number placement marks.

Now to stitch the numbers. On your machine, you need to line up the center of your number design with the center line for that number.

Stitch out the number and continue around the clock until all the numbers are completed.

Once the numbers are stitched out, we can trim up the threads.

And trim the stabilizer on the back.

At this point we can remove the white line marks on the fabric. We don’t want to use our iron to press the fabric until the lines are removed or they may not disappear. I used a wet rag and dabbed at all the marks. I didn’t try to remove all of the lines, only out to the perimeter of the clock. Anything left on the fabric outside the circle will be in the back. Then I left it to air dry.

While we wait for the fabric to dry we can start working on the other hardware for the clock. I wanted the outside of my clock to be black so I removed the metal screw and hex nut, took it outside, and spray painted it.

While I wait for that part to dry, I am going to get the inside of my clock ready.
The cardboard for your clock needs to fit just inside the inner hoop. The 14” cake round I bought was slightly too big, because the outside of my hoop is 14”. So I traced my inside my inner hoop on the cardboard.

I cut off that tiny margin so it would fit inside the hoop.

It should fit snugly in the inner hoop.

Remove the cardboard from the hoop and find and mark the center of the circle. I did this by placing it on my cutting mat so the edges touched and using my ruler to mark halfway up from the center lines.

Make a hole in the center of the cardboard. I used a small awl to make the hole and then I enlarged it by sticking one blade of my scissors in (not my fabric ones, of course) and rotated the blade.

Test your clock mechanism to ensure it fits through the hole you made. Mine ended up a little big on one side, but I’ll be sure I put that at the bottom.

Now my fabric has dried. I inspected it closely to see if the marks had all disappeared.

If there are marks left you can still try to remove them. When you’re happy that the marks are gone, it’s time to press. I used a pressing cloth and pressed on the front of the clock.

Now, using my awl, I poke a hole in the center of the clock fabric.

Using that small hole, cut the fabric out of the center of the design.

Now it’s time to assemble our clock. This is the fun part where everyone wonders how you turned a piece of fabric into a functional clock!
Take your clock mechanism and place it down on your workspace with the shaft up.

Insert the cardboard piece into the inner hoop and then place that over the clock mechanism with the shaft coming through the center hole.

Now place your fabric over the center hoop. Have the clock shaft come up through the center of the fabric.

Following the directions on your clock mechanism secure it and add the arms. For mine I had a washer and a nut that I tightened before I pressed the minute hand, the hour hand, and finally the second hand into place.

Once your mechanism is secured take your outer hoop piece (if you painted it, make sure it’s completely dry!) and secure it around the inner hoop.

Now I trimmed the excess fabric from my clock. I kept about 2 inches extra from the edge of the hoop.

To make a nice backing for the clock I used a needle and thread to do a big gathering stitch around the edge of the fabric.

Pull it tight before you secure the thread. This pulls the excess fabric to the back of the hoop.

It’s optional, but you can tack down some of the fabric with hot glue on the hoop. I did to help it lay flat against the wall. I also used a couple dots of hot glue to hold my clock mechanism in place.

Insert a battery in your clock and set the correct time. And your clock is finished! Hang it somewhere that people will see it and wonder how you did it!


I hope you try making a clock that fits your space perfectly. You can make them as big or as small as you’d like. Join us in the Designs by JuJu Embroidery Blessings Facebook Group where we can see your project, or use the hashtag #designsbyjuju anywhere on social media! We love everything you share with us!
