Toggle Nav
 Inspire.
Create.
Stitch.
Inspire.
Create.
Stitch.
Search
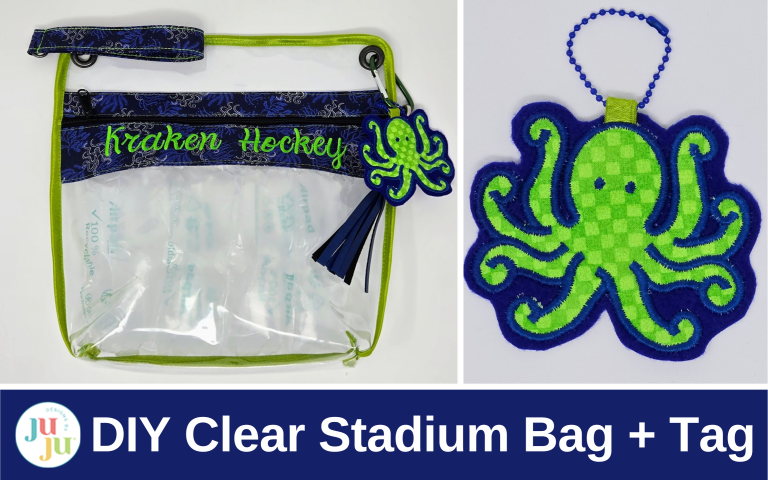
Stand out in the stands—make a clear, rule-ready stadium bag that’s stylish, secure, and easy to carry.
I did a lot of research to find out the stadium/festival rules for bringing personal items to an event. This bag fits the size and “clear” requirements, is easy to make, and can be made as a crossbody bag or wristlet. And I love when I can add a personal touch to my bags with tags!
Check out the DBJJ team’s favorite supplies in the Designs by JuJu Amazon store.
Through my research of stadium bags, I discovered not all venues allow any kind of design on the clear vinyl, some say no patches on the bag, and most want the vinyl to be completely clear—not smokey or otherwise colored. So instead of embroidering on the vinyl, we are going to add our embroidery to our zipper overlays. This serves a dual purpose: the vinyl does not need to be finger-pressed away from the zipper, and you are not sewing directly on the vinyl, making it much easier to feed through your sewing machine! We can also make a couple of hanging bag tags or charms. Have you ever been at an elementary or middle school at dismissal time? The kids have all sorts of things hanging from their backpacks. Let’s do that to our stadium bags!
Notes:
Download your designs in the correct format for your machine to your USB drive. I used the 1.25” letters to spell out my design.

Gather your supplies. I used my 6x10 and 5x7 hoops for this project.

First we are going to cut our fabric and vinyl.
From your vinyl cut:
From your fabric cut:
From SF101 cut:
Fuse your SF101 to the back of your fabrics, centering, following manufacturer’s direction.
Take the 8” x 14” fabric with SF101 on the back and fold in half, wrong sides together, matching the cut, long edges. Press. Then open this piece out and press the two long raw edges to the center fold line. Fold it back in half with the long raw edges tucked in. It should measure 2” x 14”. This is your large zipper overlay.


Repeat the above steps for both 4” x 14” fabric/SF101 rectangles and set aside for now. These are for your small zipper overlay and wristlet strap.
Load your design into your machine. Add a basting box around your design. I do this right on my machine.
Hoop your sticky-back, wash-away stabilizer in your 6x10 hoop. Without tearing the paper away, stitch the basting box on the paper side of the stabilizer. Tear away the paper only inside this basting box. It need not be perfect.

Open out your large zipper overlay and place it so the third pressed rectangle, counting from the left, is inside the basting box. Center it top to bottom in your hoop. The pressed fold lines should line up with your basting box.

With your fingers, press firmly in place.

Ensure your lettering is oriented to face the right! Stitch out your lettering.


(I do know bright green is not a Seattle Kraken color, but it is what my sweet granddaughter wanted. Sometimes it's okay to color outside the lines!)
I gently removed my embroidery from the hoop using a spray bottle of water. I gave it a spritz and the stabilizer disappeared.

Once you have removed the stabilizer with a bit more water, fold it back into shape and press with a dry iron from the back. Do not press directly on your embroidery. Set aside to dry while we attach the small zipper overlay to the top of the zipper.
Using your zipper foot, place the small zipper overlay on top of your zipper. The open edges should be away from the zipper and the single folded edge a scant ¼” away from the zipper teeth. Topstitch in place with a 3.5mm stitch length and ⅛” seam. Sew slowly and when you reach the zipper pull, stop with your needle down, raise your zipper foot and move the pull behind your foot.
Repeat for the large zipper overlay on the bottom of the zipper.
Trim your zipper with attached overlays to 12½”, centering your embroidery.

Next, gently slide your 12½” x 3” clear vinyl rectangle into the top overlay. It goes between the folds and all the way to the stitching. Use clips at either end to hold in place. Take it to your sewing machine and sew ⅛” from the top folded edge, essentially making a vinyl “sandwich” with the vinyl in between the overlay opening. I sew this outside edge with my zipper foot too as I find it easier to get a ⅛” seam.

Repeat to add the bottom 12½” x 10” vinyl rectangle. You have now completed the front of your stadium bag!

Take your 12½” x 14” back rectangle of vinyl and place it behind your front piece. Clip around the edges to hold the two pieces together. Using a spool or small circle ruler and marker, round the top two corners. Cut on your drawn line. On the bottom two corners, cut out a 1½” square.


Sew the front and back together ⅛” from the edges. Sew only from the bottom cut out, along the side, around the top and back down the side. Do not sew the bottom. Once you have sewn the front and back together, Clip your fold-over elastic along the same edges. Leave the bottom open for now.

Stitch the fold-over elastic in place, close to the edge, with a 3.5mm stitch length. Backstitching at the beginning and end of each seam.
Once you have the fold-over elastic secured, open your zipper. You are going to turn your stadium bag inside out from the bottom. To make this as easy as possible, warm your vinyl with your hair dryer. It becomes more pliable and you can turn the bag wrong side to the outside. We are going to finish the bottom seam and corners so they will be inside the stadium bag.

Sew the bottom seam the same way you did the sides, first basting the raw edges together and then covering with the fold-over elastic. Stitch the fold-over elastic in place, close to the edge, with a 3.5mm stitch length. Backstitching at the beginning and end of each seam.
Next, line up the bottom seam and side seam, offsetting a bit to reduce bulk. Push out the corners and baste. Then add the fold-over elastic to this seam. You may have to trim a bit to get the corners to line up. I trimmed a scant amount. I also turned under ¼” of fold-over elastic on the edges to the inside so the edge was not a raw edge. Stitch the fold-over elastic in place, close to the edge, with a 3.5mm stitch length. Backstitching at the beginning and end of each seam.

Once you have sewn both corners, it is time to get your blow dryer and turn your stadium bag right side out. Warm it well and it will turn like fabric.


I am using the extra-large eyelets. You can put one in one corner for the wristlet, or both corners if you would rather make a crossbody bag. A crossbody strap could be made the same way we will make the wristlet; just measure and cut your fabric strips to your desired length.
Follow the directions for your chosen grommets or eyelets. All are installed in different ways. I used my eyelet to mark a circle on my vinyl and cut out the circle carefully. Then I placed the bottom of the eyelet in the metal ring, slid my bag over the eyelet, added the top piece and used the tool to hammer it all together.

I did end up installing a second eyelet in the other top corner for bag tags. I want to “bling up” my stadium bag!
To make the wristlet, take your last piece of fabric with SF101 applied. It should measure approximately 1” x 14” with the long edges pressed to the inside. Slide the swivel hook onto the strap. Then open out the short ends and sew them together with a ¼” seam. Finger press this seam open and fold the strap back together.


Now go to your sewing machine and sew around the open edge of the wristlet and then the folded edge. I used a triple stitch on my machine and a 3.5mm length stitch. Keep moving the swivel hook out of the way as you sew around.

Once you have sewn both edges, fold the wristlet in half and sew close to the swivel hook across the short end to hold the swivel hook in place.

I made the little octopus applique into a bag tag, using the 4x4 size. I hooped two layers of wash-away stabilizer. A 5” x 5” scrap was plenty for the octopus, so I applied SF101 to the back of this piece. I had a 5” x 5” piece of felt for the back. I also cut a 2½” piece of fold-over elastic. Fold the elastic in half along the fold, and then again the long way.


Flip the hoop over and tape the fold-over elastic in place so about ½” extends above the octopus head. I used paper tape and completely covered the elastic.

Cover the back of the design with felt and tape in place. Return to the embroidery machine and embroider the satin stitch around the octopus.
Take it out of the hoop, remove the wash-away stabilizer one layer at a time, then trim the felt about ⅛” from the embroidery. Be careful not to cut your fold-over elastic tab!
I had a small chain I used on the top of the bag tag. You could use a carabiner, a round split ring, or anything you want!


Add your tag to your stadium bag along with any other decorative things you might want to add! I used a carabiner I had and added my octopus and a tassel. Now it’s time to enjoy the game!
Think about all the sports and events where a clear bag is needed! A stadium bag can be made for any sport. I am going to use the Football Applique Alphabet and make another bag for football games. I will make the tag the same way I made the octopus, with felt on the back.
Please be sure to share your projects in the Designs by JuJu Embroidery Blessings Facebook Group, or use the hashtag #designsbyjuju anywhere on social media. We all love to see what you create!
