Toggle Nav
 Inspire.
Create.
Stitch.
Inspire.
Create.
Stitch.
Search
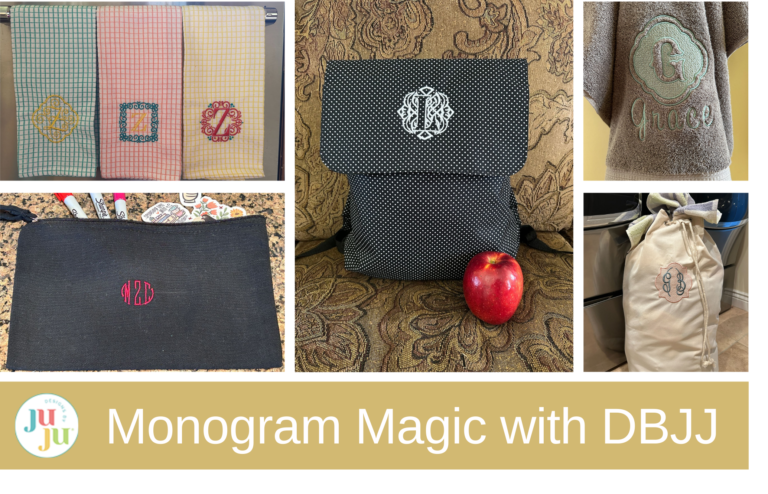
Discover simple monogramming tips to personalize towels, backpacks, laundry bags, and more!
I love creating personalized projects. And what is more personalized than a monogram? Today I will show you a few ways to use monograms and some of Designs by JuJu’s cute designs. I often say if you can hoop it, you can monogram it!
Check out the DBJJ team’s favorite supplies in the Designs by JuJu Amazon store.

When starting a project, I always locate where I want the monogram to go. For this canvas bag we will find a spot centered in the front but more toward the top of the canvas bag. I marked the center and hooped the bag with tear-away stabilizer. I used chalk on this black bag so it would show up but also wipe away easily.

For a monogram, the traditional way to set it up for an individual is with the first initial on the left, the middle initial on the right, and the last initial in the center. The center initial is usually a bit bigger than the other two. If you are making a monogram for a couple, the last initial would be in the center and the couple’s first initials on either side. I find the “rules” are contradicting on whose goes on the left and whose is on the right. So if you have strong feelings either way, you can do it how you prefer. If you don’t, I always look to see if I like the look of the monogram one way or the other and use the one I like best.
I like to use Embrilliance software to type out my monograms and see how they look. If you’re new to Embrilliance, check out Getting Started in Machine Embroidery: Using BX Font Files in Embrilliance to get started. The nice thing is if you’re using the BX format, the fonts automatically choose the left, center, and right. I used the Circular Script Embroidery Monogram for this and typed in my initials. It lined them up correctly and I was able to save this to use on my machine.

Put your hoop in your machine and stitch out the design.

Trim any jump stitches and the back side of your design. Remove the stabilizer.

Your zipper bag is complete!

For this polka dot backpack, I wanted to do a one-color, one-letter design. There were so many to choose from but I decided on the Kingston Monogram look for this bag. Because the bag is thicker it wouldn’t be easy to hoop, so I chose to use a sticky-back stabilizer. Hoop the stabilizer and then score it from corner to corner in an X. Peel off the protective backing and carefully place the backpack flap on the sticky stabilizer.

Load your design to the machine. I try to make sure the backpack is supported on the table to help everything stay in place throughout stitching.

Then stitch out your design.

When you're finished stitching, remove hoop from the machine and trim the stitches.

Remove the stabilizer. I try to remove as much as possible, but I don’t usually worry about the tiny little areas when using sticky-back stabilizer.

You’ve completed your backpack flap. I love monograms because they help my kids know which things are theirs, but they don’t show their full name for the whole world to see.

This canvas bag is big enough to use as a laundry bag. It is perfect for my college-age kids to take to school to help haul their laundry to the washing machines. But of course we need to make it so that it is easily identifiable.
First we need to figure out where we want to hoop. I decided to place the monogram toward the top of the bag. Hoop your design with some stabilizer. I used the tear-away kind.

For this design I decided to use a two-letter monogram. I also used a frame for it. I combined them in Embrilliance and transferred them to my machine. If you have the free version of Embrilliance, you can save the letters when you use the BX font and combine them with the frame on your machine.

Stitch out your design.

Change the colors as needed.

Remove the project from your machine. Trim your threads.

Remove the extra stabilizer from the back.

Press out the hoop marks.

Now you’re ready to do your laundry in style!

I love to give monogrammed towels to people getting married, to kids headed off to college, and just to friends for gifts. Kitchen towels stitch up super fast and have an impactful look. I’ll show you three different designs all on the same type of towel to help spark some creative ideas for your kitchen.
Our first step in every one of these is to hoop the towel. I used tear-away stabilizer. Placement of a monogram on a towel can differ. I like to fold the towel in thirds and have the monogram a few inches from the bottom. But I hang my towel on the oven folded in thirds. If you fold your towels in half you may want to center on the half that shows. So take into consideration how you display your towels when you hoop.

I chose to do a one-color monogram design with the Elegant Scroll One Color Small Monogram and the Elegant Scroll Frame Motif designs. On one of the coordinating towels, I put a two-color monogram with the Mary Kate Monogram design. On the last towel, I stitched a three-color monogram with the Lady Edith Monogram design.
Whichever design you’re using, the steps are the same. Hoop your towel with stabilizer and stitch out your designs.

Trim the backs.

And remove the stabilizer.

Your towels are ready to display or give away. I always think towels with coordinating colors and monograms work so well together!

When I see monogrammed bath towels in a bathroom I always think they look so nice and classy. So let’s learn how to make one.
I wanted to do the monogram on this towel with the name underneath. I used Embrilliance to help me get it set up.

For this project I used a thick tear-away stabilizer. I chose the Chic Embossed Monogram Alphabet and Ellie Script for the name on this towel, and it is a pretty densely stitched design. If your design isn’t quite as dense, you can use a couple of layers of wash-away stabilizer (the one that looks like a mesh, not like plastic wrap) so that when you wash the project it looks as nice on the backside as on the front side. But remember if you do this, the stabilizer will all wash away and there won’t be anything supporting your stitches.
Find your placement for the embroidery on the towel. Just like with the kitchen towels, think about how your towel will hang and center your design there. I like to fold my towels in thirds. My towel also had a band a few inches from the bottom so I centered my design from left to right and a couple of inches up from the band. Hoop your stabilizer and your towel. I like to use my magnet hoop for towels because of their thickness. Once it’s hooped, I top with a water-soluble topper. This is the one that looks like a piece of plastic wrap. I use this when the towel I’m embroidering on is plush or on fuzzy things like fleece. This helps the embroidery stitches sit above the fibers of the towel and not get lost down inside.

Stick your hoop in the machine and start stitching out your design.

Continue through all the steps. I love this design on towels in either a contrasting color or a matching color. They both look great!

When you're finished, trim the threads on the front and back. I like to leave the water-soluble topper on for this step so I don’t accidentally cut the towel loops.

Remove the stabilizer from the back. Since this is a tear-away stabilizer, I try to remove as much as possible.

Peel off the water-soluble topper. If you leave little pieces of it behind, they will wash away the first time it’s washed, but I do try to remove as much as possible.

And enjoy your towel that is now one of a kind!

I hope you have enjoyed seeing some projects that you can easily monogram. We would love to see what you decide to monogram and what colors you choose for your projects. Please share them with us in the Designs by JuJu Embroidery Blessings Facebook Group, or anywhere on social media using the hashtag #designsbyjuju. We love to see what you create!
