Toggle Nav
 Inspire.
Create.
Stitch.
Inspire.
Create.
Stitch.
Search
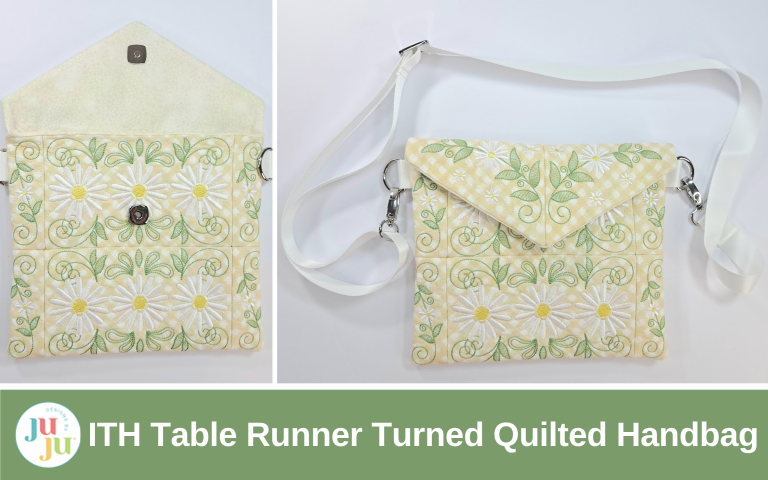
Turn your ITH Daisy Table Runner into a stylish handbag—get creative and make the most of your design purchase!
If you’re anything like me, you love when Designs by JuJu creations can be used in more than one way. In today’s blog post, we’re transforming the ITH Daisy Table Runner into a stylish handbag! Follow along as I walk you through the steps to create this unique, one-of-a-kind purse.
Looking for additional tips and tricks? Follow along with this companion YouTube video to see this project in action.
Check out the DBJJ team’s favorite supplies in the Designs by JuJu Amazon store.

Before I ever began stitching my handbag, I first went to my Embrilliance Essentials embroidery software and made a layout for my purse. I printed out each of the panel pieces and built my handbag out of paper.

I then went back to Embrilliance and used the Color Sort feature to combine multiple panels into one hooping. Using this feature can save you a lot of time, especially if you have a single-needle machine and a larger hoop capability. This project can still be made even without using embroidery software and a larger hoop, but I did want to mention this if you have those options available to you.
For my ITH Daisy Table Runner handbag, I decided to use the following panels:
These panels combined to make a finished handbag size of approximately 8” tall and 9” wide.
Step 1: Load the first block(s) you would like to stitch onto your embroidery machine.
Note: I am stitching 2 - 5x7 3 Daisies Blocks for my example below. I used the Color Sort feature on Embrilliance Essentials and my larger hoop to save on time and hoopings.

Step 2: Hoop one piece of no-show mesh cut-away stabilizer.

Step 3: Run the placement line for your batting.

Step 4: Place the batting directly on top of the placement lines and run the tack-down stitch to secure.
Trim away the excess batting right along the tack-down stitches.

Step 5: Place your fabric (with SF101 fused to the back) on top of the batting and run the tack-down stitches to secure the background fabric.

Step 6: Run the decorative stipple motif and daisy design elements.

Step 7: Repeat steps 3–6 for any remaining blocks within the hooping.
Remove the hoop from your machine and unhoop your blocks. Trim away all excess stabilizer.

Next, trim your blocks ½" from the outer stitch line. This trimmed edge will give you the seam allowance you’ll need for putting everything together.


Step 8: Repeat steps 1–7 for any remaining blocks/hoopings needed for the purse.

Step 9: Arrange all blocks into their respective purse panel designs.

Step 10: Starting with the front panel, you will want to stitch “strips” of equal lengths (border, main, border).
Take one border block and the main daisy block and place them right sides together.
Begin lining up the outermost tack-down stitches of both blocks and pin or clip in place.

Repeat for the second border block and the other side of the daisy block.

Step 11: Using a sewing machine, stitch just inside the outermost tack-down stitches.
Press the seams open.
If you have completed this step correctly, you should no longer see the tack-down stitches from the front seams.

Step 12: Repeat steps 10–11 for any remaining blocks on the front and back panels of the handbag, as well as the top flap.

Step 13: Stitch together the top and bottom “strips” for the front panel following the steps mentioned above.


Repeat these steps for the back panel.
You should now have one large front panel, one large back panel, and one top flap.

Step 14: Now it is time to cut your fabric for the lining. Cut two pieces of fabric the exact same size as your front and back panels.

Place the liner fabric right sides together and pin along the sides and bottom, leaving a 5” opening along the bottom. You will turn your handbag through this opening later in the assembly process.


Step 15: Stitch the lining pieces together using a ½” seam allowance around both sides, and bottom, leaving a 5” opening along the bottom. DO NOT stitch along the top of the lining.

Step 16: Next, we will prepare the liner fabric for the handbag flap. Cut a piece of lining fabric slightly larger than the top flap.
Pro Tip: If you want your flap to be firmer, you can use embroidery-safe spray adhesive to fuse a piece of cut-away stabilizer to your liner fabric.

Place the bag flap and the liner fabric right sides together and pin in place.

Stitch just inside the outermost tack-down stitches along the sides and bottoms of the bag flap. DO NOT stitch along the top.
Trim away the excess fabric, leaving a ¼” border along the sides and bottom. DO NOT trim away the excess fabric along the top.

Turn the flap through the opening along the top and give it a good press.

Step 17 (Optional): Add your handbag closure/hardware. I used a magnetic snap for my handbag. You could use a kam snap, velcro, button, or no closure if you prefer.

Step 18: Add the D-ring/hardware for your handbag strap. If you do not want to use D-rings, you can stitch the strap directly to the bag.


Step 19: Next, we will stitch the flap to the back panel. Place the top flap and back panel right sides together.
Center the flap and line up the outermost tackdown stitches along the top.
Pin/clip in place.


Stitch just inside the outermost tack-down stitches to secure the flap to the back panel.

Step 20: Now, it is time to stitch the front panel to the back panel.
Line up the tack-down stitches and pin/clip in place along the sides and bottom, leaving the top of the bag open. **Make sure to fold the top flap up and out of the way before pinning/clipping.**


Stitch just inside the outermost tack-down stitches.
Trim away the excess fabric, leaving ¼” border around the sides and bottom of the bag. Trim the corners at an angle.

Step 21: Flip the bag lining right side facing out and push out the corners using a turning tool.

Tuck the top flap inside the front and back bag panels and place the lining inside (right sides together). You should still see the wrong sides of the bag on the outside. **DO NOT flip your bag.**
Pin or clip along the top edge of both the handbag and lining.


Step 22: Using a sewing machine, stitch just inside the outermost tack-down stitches to secure the lining to the front and back bag panels.


Step 23: Pull the lining out from inside the bag and turn your entire bag through the opening in the bottom of the liner.
Give the liner and handbag a good press.

Step 24: Close the opening in the bottom of the liner using a sewing machine, hand stitching, or other adhesive. I used Peel n Stick Fabric Fuse.

Push the lining down inside the bag and your project is complete!


I hope you have enjoyed today's project twist on creating a handbag from the ITH Daisy Table Runner. This handbag turned out absolutely adorable and is the perfect crossbody bag to wear for everyday use. It could be customized using a variety of fun and beautiful fabrics to suit any occasion and personality. If you loved this tutorial, be sure to join the Designs by JuJu Embroidery Blessings Facebook Group for more inspiration and to share your own creations, or use the hashtag #designsbyjuju anywhere on social media. We can’t wait to see what you make! Happy stitching!