Toggle Nav
 Inspire.
Create.
Stitch.
Inspire.
Create.
Stitch.
Search
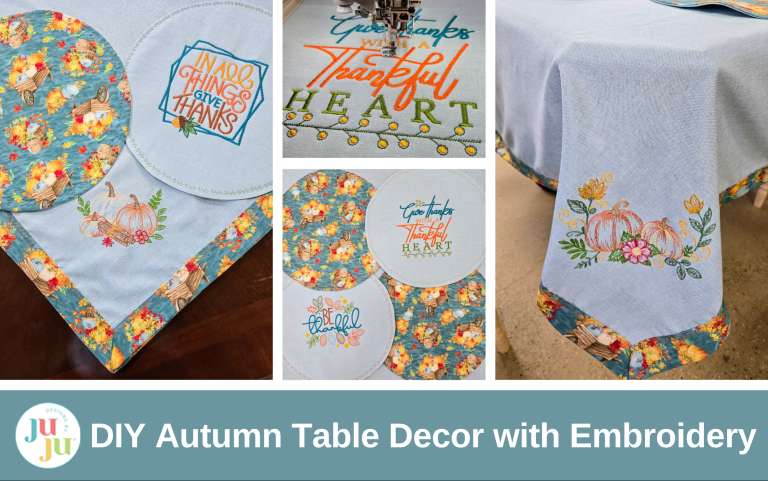
Fall fun awaits! Stitch autumn favorites on a tablecloth, then turn napkins into charming placemats.
Autumn and machine embroidery were made for each other. The colors! The designs! The joy of creating! I had so much fun choosing designs for this project. I love the change in seasons and autumn colors add such a spark. I found my tablecloth and then looked for matching napkins. Unfortunately, that was a little difficult. So my tablecloth is an easy wash-and-dry, loosely woven polyester, and my napkins are a cotton blend. I washed them all together before beginning because I knew the napkins would shrink, and they did. I planned to turn the napkins into placemats to add more color to my table setting, but because of shrinkage, some were no longer square. Let’s see how we can work around that.
Check out the DBJJ team’s favorite supplies in the Designs by JuJu Amazon store.

Start by making a template from the freezer paper. I folded a large square in half, and then in half again to make ¼ of the paper. I pulled out an old compass from my kids’ school days and drew a quarter circle. It wasn’t quite big enough, so I added to it with a ruler and pen. I wanted a 15” circle, or as close as I could get so it would cover the majority of my napkin.

I used my template to cut circles of the fusible fleece. Just rough cut around the edges—we will trim it up later. Press your napkins, then press the fusible fleece circles to the back of your napkins, centering them as best you can.

Load your designs to your USB stick. I used the 8x8 size designs for my placemats.

Hoop the cut-away mesh stabilizer as well as your napkin with the fusible fleece on the back. I needed to use my 9.5x9.5 hoop. Embroider your designs.


Once you are finished embroidering, trim any jump stitches, trim the stabilizer close to your design, and trim any wild threads on the back.

We are going to use our freezer paper template to trim the napkin to size. The beauty of using freezer paper is that it can be pressed to the fusible fleece, using a dry iron, and it will temporarily adhere—no pins needed. Also, you can see through the freezer paper to ensure your design is centered.
Once pressed in place, trim your napkin into a circle. Repeat for all your napkins.

Another bonus to using freezer paper is that it can be reused. Peel it off the fusible fleece and press it to your backing fabric to cut out your backing circles. Again, fuse with a dry iron. I left my iron on the cotton setting and only did a quick press.
Cut out the backing circles and peel off the freezer paper.

Place your napkin circle and backing circle right sides together. Use pins or clips to hold them. Sew around your circle with a 3/8” seam allowance, leaving 5” unsewn to turn your placemat right side out. Trim the seam allowance to ¼” with pinking shears, except for the opening. I leave the full seam allowance for the opening so I can turn it back more easily. *If you don’t have pinking shears, to reduce bulk, make little V-shaped cuts around the circle in the seam allowance of the napkin and backing fabric separately. Then trim the seam allowance to ¼”. It is much easier to make the cuts into the larger seam allowance and then trim it down than it is to trim first.

Now you are ready to turn your placemat right side out through the 5” opening you did not sew closed. Run your finger or a chopstick around the seam on the inside so it lays nicely. Give it a good press, pressing your opening seam allowance to the inside. With a needle and matching thread, sew the opening closed by hand.

This next part I call playing, and it is so much fun. My machine is an embroidery/sewing machine combo, but I don’t use the specialty sewing stitches very often. Today I did! I found a decorative stitch and sewed around the outside edges of my placemat.

I chose a different stitch and different color thread for each placemat.


Once again upload your chosen designs to your flash drive. This time I am using the 5x7 Vintage Sketch Pumpkins. I decided to put them on the corners of my rectangular tablecloth.

I hooped a tear-away/wash-away stabilizer and my tablecloth. This stabilizer washes out of the open areas, but stays behind the stitched areas. Since my tablecloth has a loose weave, this supports my stitches. If your tablecloth is linen or cotton, a wash-away stabilizer would work equally well.
I was so excited to get back to my embroidery machine that I forgot to take a photo of just the hooping, but you know the drill.
I measured 6” from the corner of the tablecloth to the edge of my hoop. The design is approximately 1” from the side of the hoop. I did this for all four designs. BUT three of the designs are vertical as shown below. It was very easy to hoop and ensure my design was 1” from the inside of the hoop. One of the designs is horizontal. Remember to use your positioning buttons to move it to 1” from the bottom of the hoop.


Embroider the designs, one on each corner of the tablecloth. Since this is a sketch design, it is the perfect time to use some variegated thread. I love the dimension variegated threads can give a design. I used an orange to golden yellow on the smaller pumpkin below, and a pink/red on the inside of the flower.

If it were a satin stitch outline, the variegated thread would have made stripes. Since it is the sketch stitch, the thread adds texture and dimension. Don’t be afraid to try new things with your thread. Trim any jump stitches and remove your hoop. Then on to the next corner.
Once all four designs are embroidered, trim the back thread tails and the stabilizer ¼” from the stitching. After I trimmed the stabilizer, I threw the whole tablecloth in the washing machine. I only needed to lightly press the designs with a press cloth once washed and dried.


For regular binding with mitered corners, I followed this tutorial: Binding 101 by Melanie. The only things I did differently were:

I hope you will try making a tablecloth and placemats for your home. Please share them in the Designs by JuJu Embroidery Blessings Facebook Group, or use the hashtag #designsbyjuju anywhere on social media. We love to see what you create! Happy embroidering!
